CBSE Notes For Class 6 Science Chapter 4 Getting To Know Plants

Getting To Know Plants

There is a large number of plants growing around us. These differ in shape, size, color, and height. Some plants are small, some are very big and some are just patches of green on the soil.

Some plants have green leaves, while B some have reddish ones. Similarly, some plants have huge red flowers, while, some have tiny blue ones.

Some unwanted plants grow in crop fields, lawns, or in pots. These are known as weeds, for example, bermuda grass. They all are living entities, but are different from animals. They grow on soil and remain fixed in one place.

CBSE Notes For Class 6 Science Chapter 4 Getting To Know Plants

Types Of Plant

According to their size and nature of stem, plants are classified into the following three categories

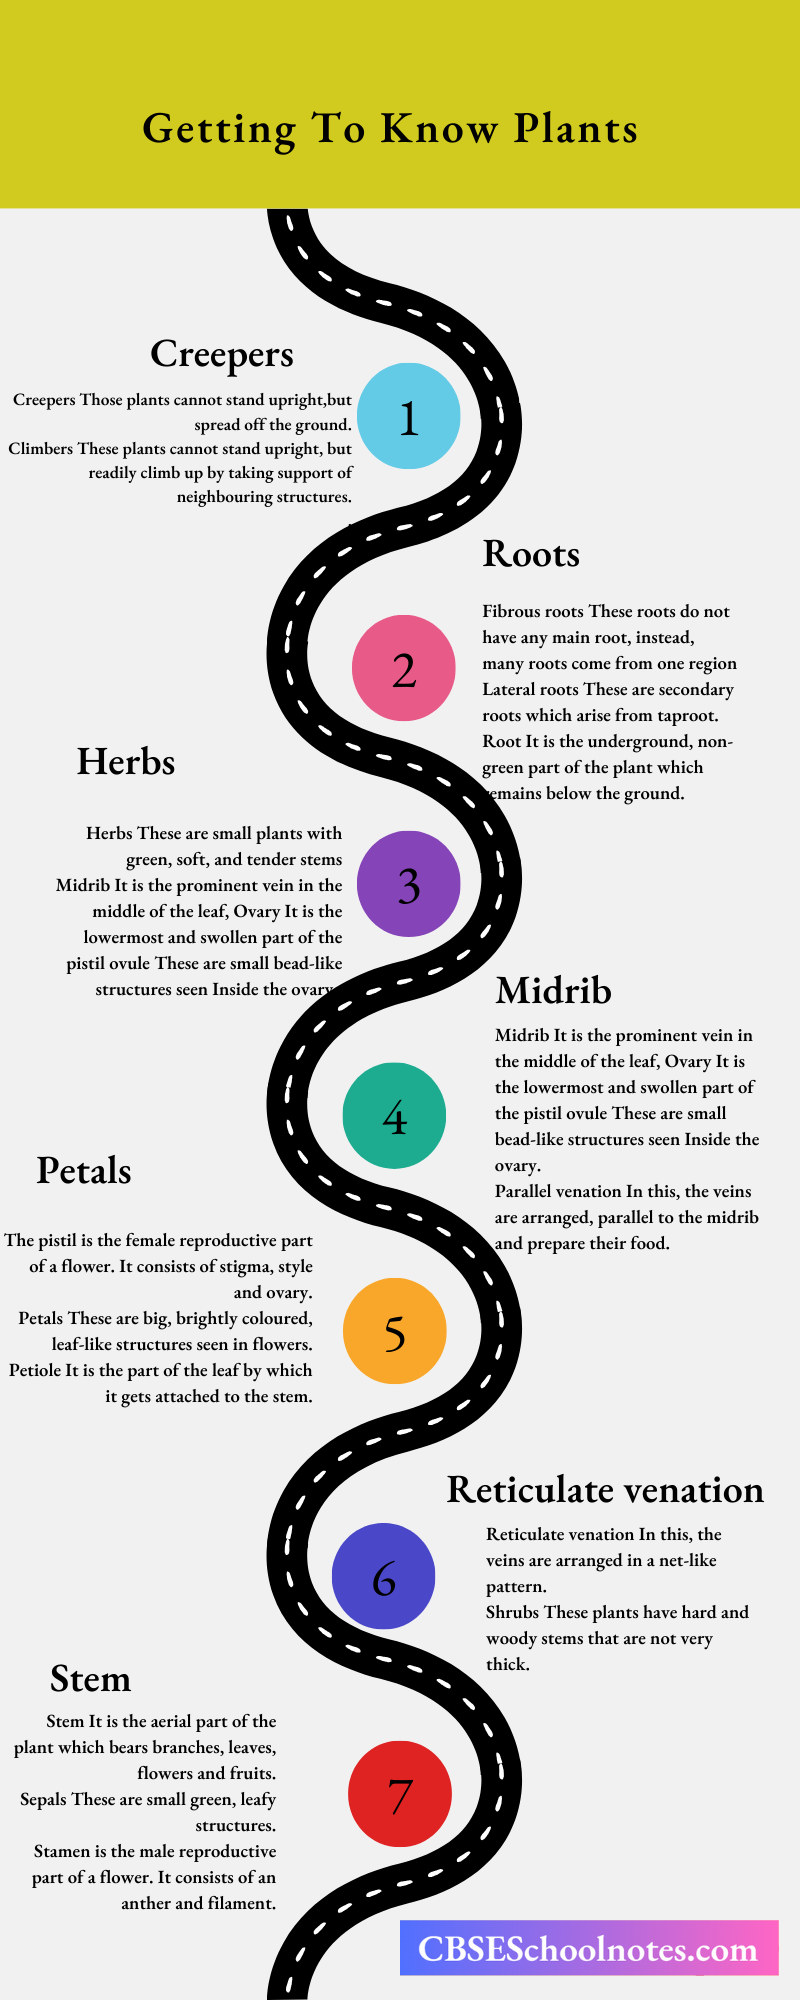
  1. Herbs These are small plants with green, soft and tender stems. They do not have many branches, for example, bathua, tomato, paddy, grass, mint, etc.
  2. Shrubs These are bigger than herbs. Their stem is hard, but not very thick and has branches at the base of the stem, for example, jasmine, lemon, rose, tulsi, etc.
  3. Trees These are very tall and have hard and thick brown stems. The stems have branches on the upper part of the plants, for example, neem, mango, peepal, etc.

Read and Learn More Class 6 Science Notes

CBSE Notes For Class 6 Science Chapter 4 Getting To Know Plants Types Of Plants

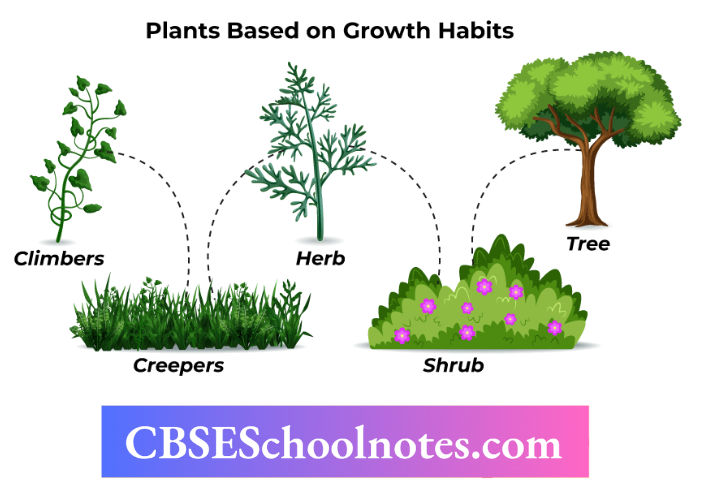
There are some plants which are different from herbs, shrubs and trees. These are called creepers and climbers.

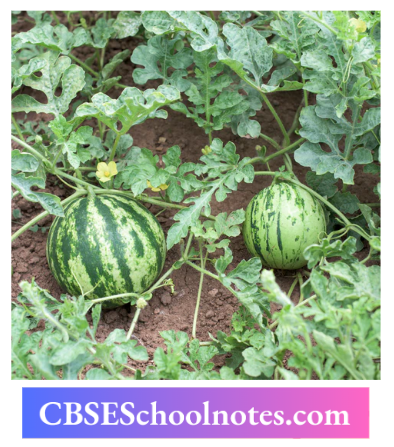
Creepers are plants that have thin, long and weak stems which cannot stand upright but spread on the ground, for example, strawberries, pumpkins, watermelons, etc.

CBSE Notes For Class 6 Science Chapter 4 Getting To Know Plants Creepers

Climbers are plants having soft, green and weak stems which cannot stand upright just like the creepers, but readily climb up taking support from nearby objects or trees, for example, bitter gourd, grapevines, bean stalks, etc.

CBSE Notes For Class 6 Science Chapter 4 Getting To Know Plants Climbers

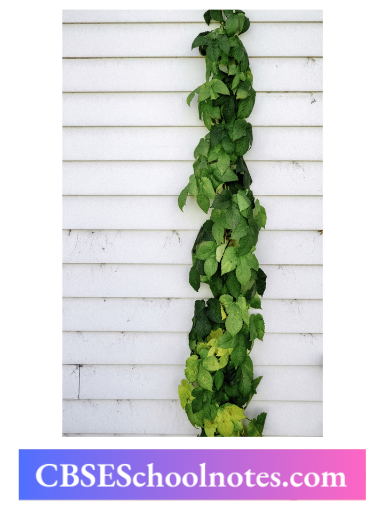
Science Insight A climber plan, has special organs called tendrils for climbing. Some of these have stem tendrils whereas others have leaf tendrils.
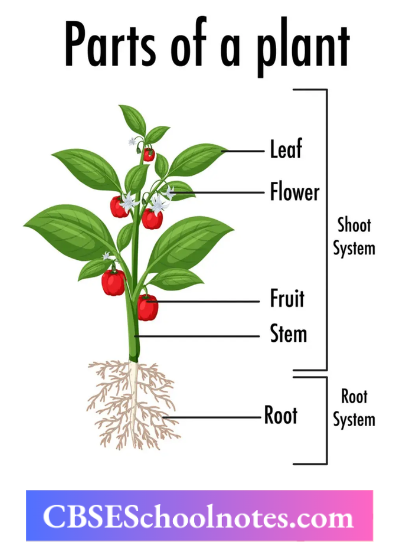
Parts Of A Plant

A plant is divided into different parts, i.e. stem, leaves, roots, etc. Each part performs a specific function.

CBSE Notes For Class 6 Science Chapter 4 Getting To Know Plants Parts Of A Plant

Stem

It is the aerial part of the plant which bears branches, flowers, buds, leaves and fruits. It may be green, hard or woody.

Functions Of Stem

It performs the following functions

  1. It helps in the upward movement of water and minerals from roots to different parts of the plants.
  2. The stem also conducts food from leaves to various plant parts through narrow tubes present inside it.
  3. Some stems get modified into various other forms in different plants to perform special functions, like in potato, onion and ginger, the stem is underground and modified to store food.

Leaf

It is a thin, flat and green part of the plant. Leaves of different plants have different shapes and sizes.

Parts of a Leaf

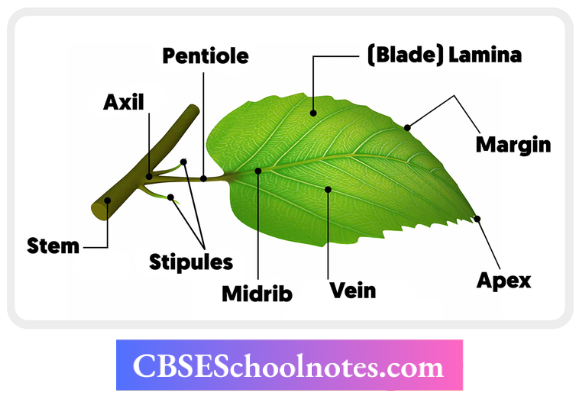
A leaf has the following parts

  1. Petiole (leafstalk) It is a thin stalk by which the leaf is attached to the stem.
  2. Lamina (leaf blade) It is the broad, green flattened part of a leaf. There are several small, thin lines running across the lamina called veins the central vein or the main vein of the leaf is called Madrid.

CBSE Notes For Class 6 Science Chapter 4 Getting To Know Plants The Parts Of A Leaf

Science Insight A leaf without a petiole is called a sessile leaf. In such plants, the leaves are attached directly to the plant stem.

Leaf Venation

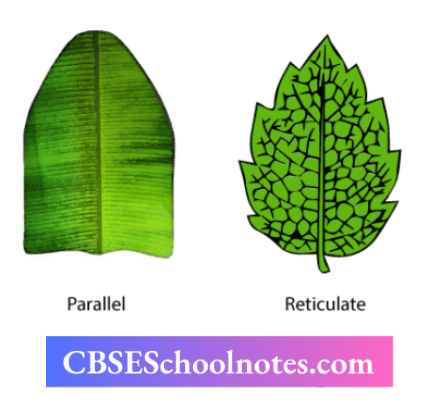
The arrangement of veins in the leaf lamina is called leaf venation. There are two types of venation seen in different plants.

  1. Reticulate Venation In this type of venation, veins are arranged in a net-like pattern on both sides of the midrib. This type of venation is found in peas, neem, peepal, tulsi, mustard, sunflower, orange, guava, rose etc.
  2. Parallel Venation In this type of venation, veins are arranged parallel to each other and also along the midrib. This type of venation is found in certain plants like wheat, maize, onion, garlic, lily grass, etc.

CBSE Notes For Class 6 Science Chapter 4 Getting To Know Plants Leaf Venation

Functions of Leaves

They perform the following functions

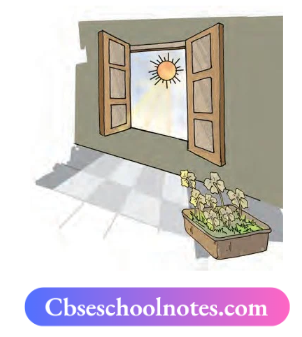
  1. Leaves prepare their food in the presence of sunlight with the help of a green-coloured substance present in them. For this, they use water and carbon dioxide from the air. This process is called photosynthesis. Oxygen is given out in this process. The food prepared by leaves ultimately gets stored in different parts of the plant.
  2. They also help the plant to get rid of excess water by the process of transpiration.

Root

It is the underground, non-green part of the plant which remains below the ground, i.e. in soil.

Types of Root

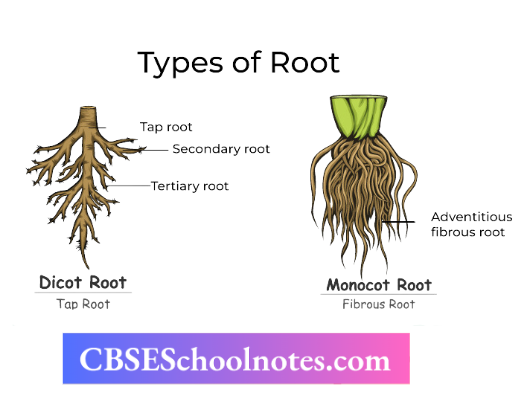
There are mainly two types of roots

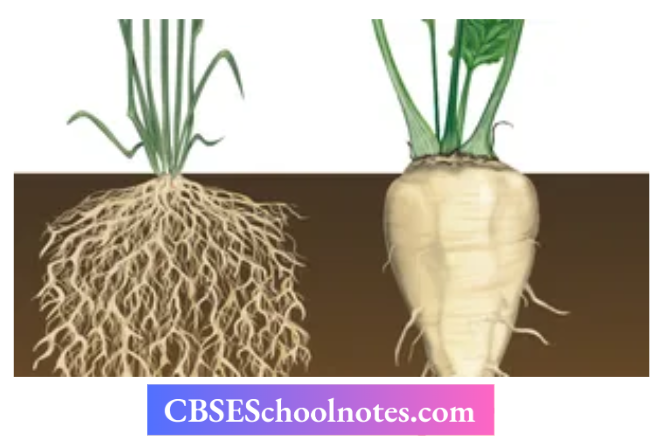
  1. Tap Root In some plants, there is one thick main root called tap root from which arises the smaller roots called lateral roots. Tap root grows vertically downwards into the soil and lateral roots spread in various directions. It is found in plants like peas, radishes, carrots, neem, mango, tulsi, marigolds, mustard and balsam.
  2. Fibrous RootIn some plants, there is no main root. All roots are similar and make a bushy appearance. This type of root is called fibrous root. It is found in plants like onion, lily, wheat, maize, grass and millet.

CBSE Notes For Class 6 Science Getting To Know Plants Types Of Roots

Functions Of Roots

They perform the following functions

  1. Roots anchor the plant to the soil. This prevents the plant from being pulled out easily or blown away by strong winds.
  2. They also absorb water and minerals from the soil. This helps in the manufacture of food by leaves.
  3. They hold the soil together. In this way, roots prevent the soil from being blown away by wind or washed away by water. This also helps in the conservation of soil.
  4. They help in the storage of food. Radish, carrot and turnip eaten by us are swollen tap roots. Similarly, Dahlia and sweet potatoes are fibrous roots which get modified to store food.
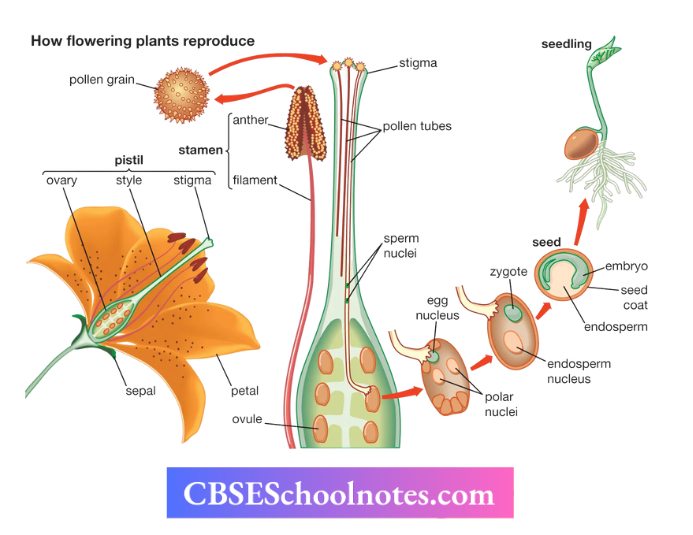
CBSE Notes For Class 6 Science Chapter 4 Getting To Know Plants

Flower

It is the reproductive structure of the plants. A flower has a stalk by which it is attached to the stem. Different types of plants bear different types of flowers, but the basic structure is almost the same in all plants (except a few).

Parts Of The Flower

A typical flower consists of four distinct parts or whorls, i.e. sepals, petals, stamens and pistils.
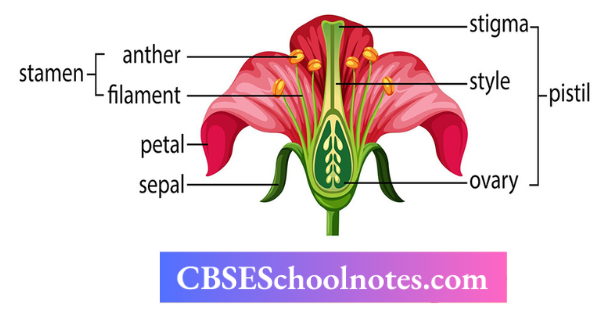
CBSE Notes For Class 6 Science Getting To Know Plants Parts Of Flowers

Sepals

The sepals form the outermost whorl of the flower. These are small, green leaf-like structures. They protect the flower in the bud stage.

Petals

They form the second whorl of flower lying inner to sepals. Petals are generally big and coloured structures. They vary in shape, size and structure in different plants. These are mostly bright in colour to attract insects, animals and even human beings.
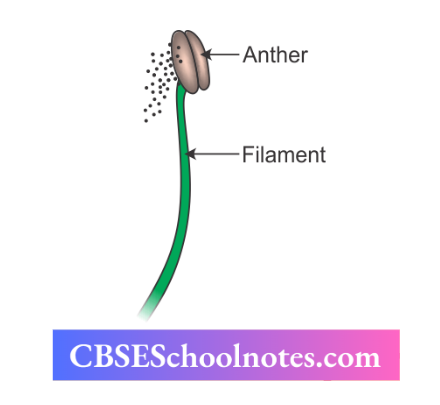
Stamens

It is the third whorl of flower that lies inner to petals. Stamens are the male reproductive part of a flower and consist of two parts

Anther is the swollen long structure at the tip of each stamen. It contains a small powdery substance called pollen grains.

Filament is a long slender stalk-like structure which supports the anther.
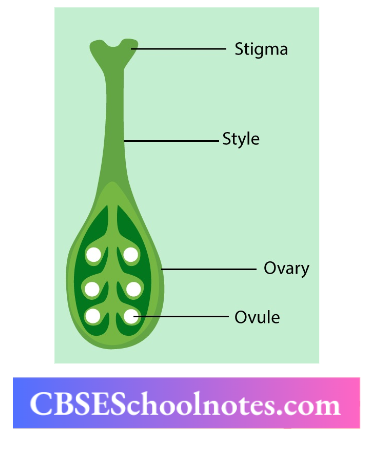
CBSE Notes For Class 6 Science Getting To Know Plants Stamnes

Pistil

  1. The innermost part of a flower is called a pistil. This is the female reproductive part of a flower.
  2. It consists of the following three parts
  3. Stigma is a slightly swollen part at the top of the style. It is a small, round and sticky part that traps the pollen grains.
  4. Style is a long, thin and slender stalk in the middle that is attached to the stigma.
  5. The ovary is the swollen part present at the lowermost portion. It contains many ovules (egg-like structures).

CBSE Notes For Class 6 Science Getting To Know Plants Parts Of A Pistill

Science Insight The fruits and seeds are formed from flowers by the process of pollination and fertilization.

Activity 1

Aim: To show that water moves up through the stem of a plant.

Materials Required: A glass filled with water, red ink, stem of balsam plant, sharp object/knife, dropper.

Procedure:

  1. Take a glass filled with one-third of water and add some drops of red to it using a dropper.
  2. Cut the base of the stem of the balsam plant (or any other herb) carefully using a knife and put it in the glass.
  3. Observe the plant the next day.

CBSE Notes For Class 6 Science Getting To Know Plants The Stem Of A Plant

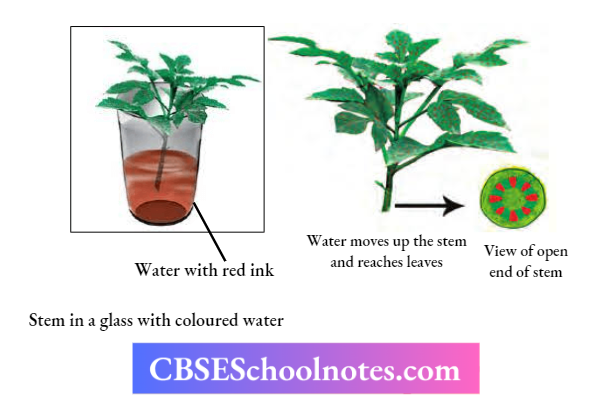
Observation We will observe that the colour rises in the stem, i.e. some parts of the stem become red. If this is kept for a longer period, the colour will appear in the veins of the leaves also.

Conclusion This activity shows that the stem helps in the upward movement of water and minerals to leaves and other parts attached to the stem.

Activity 2

Aim: To make the impression of the leaf on a white paper.

Materials Required: A white sheet of paper, a pencil, and a leaf of any plant.

Procedure:

  1. Put a leafunder a white sheet of paper.
  2. Hold it in place and start rubbing your pencil tip gently over the portion ofthe paper covering the leaf, keeping the pencil tip sideways.

CBSE Notes For Class 6 Science Getting To Know Plants Taking An Impression Of A Leaf On Paper

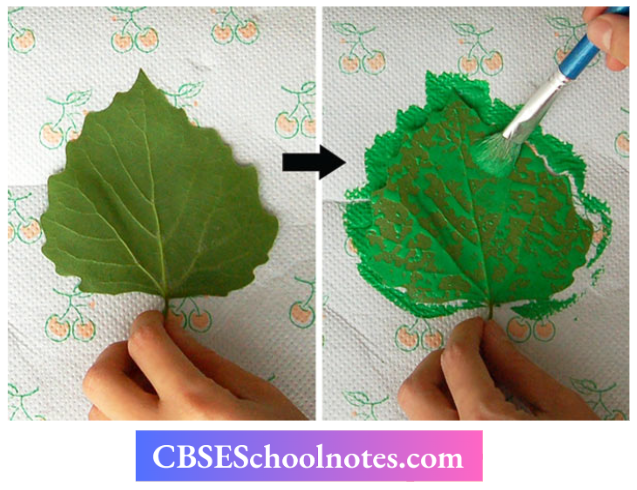
Observation: We will get the impression with some lines, i.e. leaf impressions are seen on the sheet defining its shape, size and venation.

Conclusion: This activity shows that the impression ofthe leaf is similar to that of the original leaf.

Activity 3

Aim: To show transpiration in plants.

Materials Required: A healthy plant, two transparent polythene bags and thread.

Procedure:

  1. Take a well-watered, healthy plant that has been growing in the Sun.
  2. Enclose a leafy branch of the plant with one of the polythene covers and tic up its mouth with thread.
  3. Take the other polythene bag and tie up its mouth with thread. Keep it in the Sun just like the previous one
  4. After a few hours observe the inner surface of the covers.
  5. Remove the polythene bag after the activity

CBSE Notes For Class 6 Science Getting To Know Plants Experimental Set Up To Show Transpiration

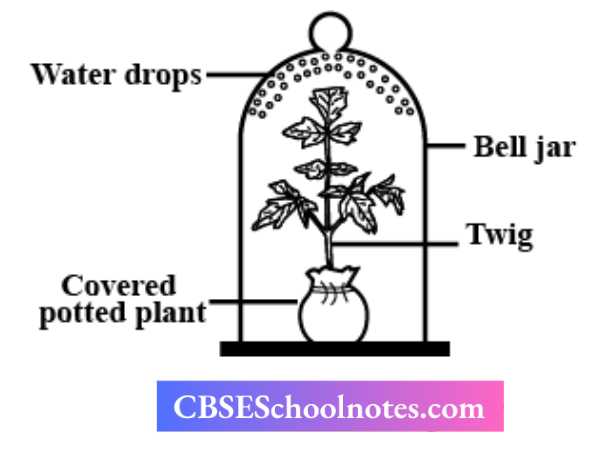
Observation: We observe that after some time small droplets of water appear inside the polythene bag covering the leafy branch of the plant.

This is due to the loss of water from the leaves which occurs by the process known as transpiration. Water droplets do not appear inside the empty polythene cover since the plant is absent.

Conclusion: This activity shows that transpiration is performed by the leaves.

Activity 4

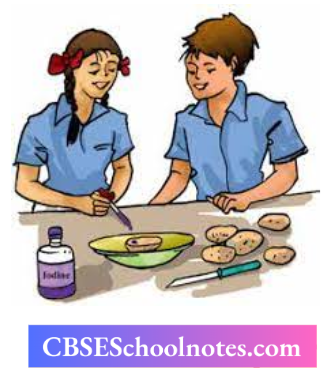
Aim: To show that a leaf produces starch as a result of photosynthesis.

Materials Required: A leaf, spirit, a beaker, test tube, tripod stand, burner, water, iodine solution, dropper and watch glass.

Procedure:

  1. Take a test tube and put a leaf in it.
  2. Pour spirit into the test tube, so that the leaf gets completely immersed in it,
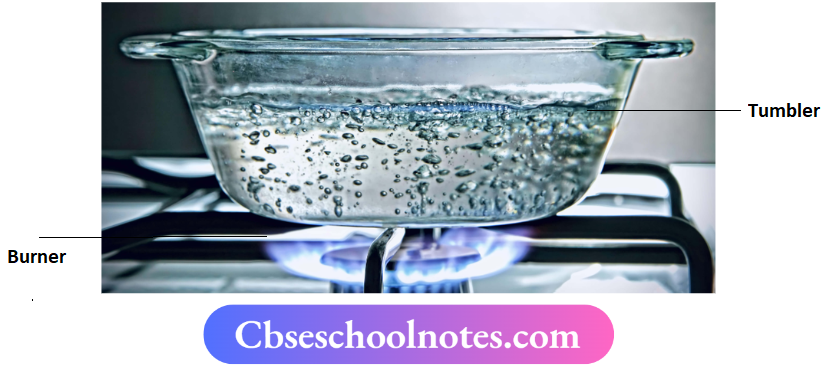
  3. Now, place this test tube in a beaker half-filled with water.
  4. Heat the beaker till all the green colour from the leaf comes out into the spirit in the test tube.
  5. Take out the leaf carefully and wash it with water.
  6. Place the leaf in a watch glass and pour iodine solution over it using a dropper.

CBSE Notes For Class 6 Science Getting To Know Plants To show that leafproduces starch as a result of Photosynthesis

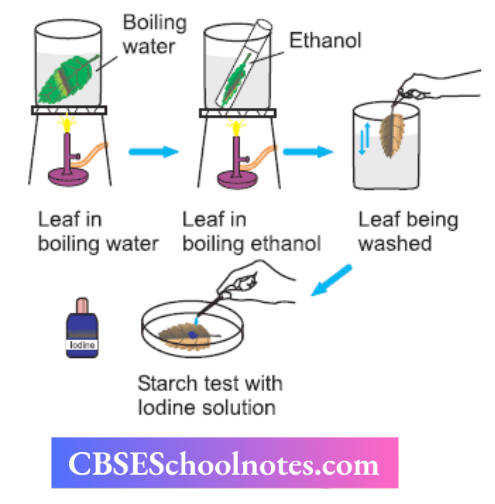
Observation: The leaf turns blue-black showing the presence of starch in it.

Conclusion: This activity shows that leaves contain starch which is the product of photosynthesis.

Activity 5

Aim: To test that roots are essential for the plant.

Materials Required: Two pots, some soil, a blade or a pair of scissors, khurpi (for digging) and water.

Procedure:

  1. Select two plants ofthe same kind from an open ground.
  2. Dig them out with roots, taking care that roots do not break.
  3. Place one ofthe plants in pot A.
  4. Cut off the roots from the other plant, and place this plant in pot B.
  5. Water them regularly
  6. Observe both plants after a week.

CBSE Notes For Class 6 Science Getting To Know Plants Plant with and without roots

Observation: We will observe that the plant with roots planted in pot A is healthy and alive, while the plant without roots in pot B is wilted and gradually dies.

Conclusion: This activity shows that roots are necessary to keep the plant healthy and alive.

Activity 6

Aim: To see that plant roots hold/anchor the plant in the soil.

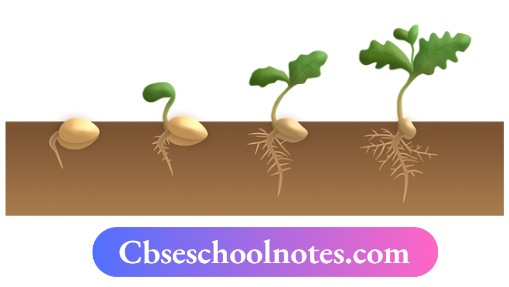
Materials Required: Seeds of gram and maize, bowls, cotton wool and water.

Procedure:

  1. Take two bowls and place some wet cotton in them.
  2. Put 3-4 seeds of gram in one bowl and maize in the other.
  3. Keep the cotton wet by sprinkling water every day, until the sprouts have grown into young plants.
  4. After a week, try to separate the young plants from the cotton.

Observation: We will find that it is difficult to pull the plant out as roots established anchor the plant firmly. Conclusion This activity shows that plant roots help in holding the plant firmly in the soil.

Activity 7

Aim: To observe the structure of an ovary in a flower.

Materials Required: Flowers of China rose, a blade, water, a magnifying glass, and a sheet of paper.

Procedure

  1. Take 2 flowers of China rose.
  2. Remove sepals and petals.
  3. With the help of a blade, carefully cut the ovary of one flower longitudinally and of another flower transversely.
  4. Put a drop of water on the cut pieces of ovary to Prevent drying
  5. Observe the structures with a magnifying glass

CBSE Notes Class 6 Science Getting To Know Plants The Structure Of A Ovary In A Flower

Observation: We will observe small bead-like structures inside the ovary.

Conclusion: Small bead-like structures inside the ovary are called ovules.

CBSE Notes For Class 6 Science Chapter 3 Separation Of Substances

Separation Of Substances

Those materials that contain one or more than one type of constituent particles or components are called substances. These occur in nature both in pure and impure or mixed forms.

CBSE Notes For Class 6 Science Chapter 3 Separation Of Substances

Pure Substances

These are substances that are made up of only one kind of particle, for example, silver, gold, iron, etc. They cannot be separated into two or more substances.

Read and Learn More Class 6 Science Notes

Mixtures or Impure Substances

These are the substances made up of two or more pure substances, for example, air is a mixture of many gases like nitrogen, oxygen, and carbon dioxide. The different substances present in a mixture are called its components or constituents.

The constituents of a mixture are segregated from each other by a process called separation. For example, grain is separated from stalks, tea leaves are separated from the liquid with a strainer while preparing tea, milk, or curd is churned to separate the butter.

CBSE Notes For Class 6 Science Chapter 3 Separation Of A Substances

Purposes Of Separation Of Substance

Most substances that occur in nature may contain one or more useful substances or one useful substance and one or more harmful or unwanted (undesirable) substances.

To make the available substance fit for use, these impurities must be separated from the useful substance. The substances to be separated may be particles of different sizes or materials. These may be solids, liquids, or even gases.

The separation of substances is carried out for the following purposes

  1. To remove impurities or harmful components For example, small pieces of stones and undesirable seed grains are removed from rice and dais before cooking. The useless pieces of stones and seed grains are thrown away.
  2. To remove non-useful components, For example, tea leaves are separated from the liquid with a strainer while preparing tea.
  3. To separate two different, but useful components A mixture may contain one or more useful constituents. These should be separated for their proper use. For example, milk or curd is churned to obtain butter and buttermilk.

Methods Of Separation

Separation of useful substances from unwanted substances is very common in our day-to-day lives and laboratories/industries. In day-to-day life, we use simple methods to carry out separation.

Some most commonly used methods for separating the constituents of a mixture are shown below

CBSE Notes Class 6 Science Chapter 3 Separation Of Substances Sepration of soild and liquid mixture

Handpicking

The process of separating solid particles from a mixture by hand is called handpicking. This method is used to separate slightly larger-sized particles present in small quantities (impurities) like stone, husk, pieces of dirt, etc. from the grains of wheat, rice, pulses, etc.

Hence, in such cases where the quantity of such impurities is not very large, handpicking is a convenient method of separating substances.

CBSE Notes Class 6 Science Chapter 3 Separation Of Substances Handpicking Stones From Grains

Threshing

It is the process of separating grains from stalks of harvested crops. Fully matured crops like paddy (rice) or wheat are harvested from the field. During this, the crop plants are cut close to the ground.

Stalks are dried in the Sun before the grains are separated. Each stalk has many grains attached to it. The grains attached to the stalks are covered in a thin layer called chaff.

The grains are then separated from stalks by the process of threshing. In this process, the stalks are beaten to free the grain seeds.

CBSE Notes Class 6 Science Chapter 3 Separation Of Substances Threshing Of Paddy Stalks

Threshing can be done by following the ways

  1. By holding the bundles of stalks in hand and beating them on hard surfaces.
  2. By allowing bullocks to trample the stalk.
  3. By machines, in case of large quantities of grains.

Winnowing

The method used to separate heavier and lighter components of a mixture by wind or by blowing air is called winnowing.

This method is commonly used by farmers to separate lighter husk particles (thin, dry outer covering of various seeds) from heavier seeds of the grains.

The steps involved in the separation of husk from grains with the help of wind are as follows

  1. The mixture of wheat grains and husk is taken in a winnowing basket (also called chhaaj in Hindi) plate or newspaper.
  2. Farmers take this mixture in open ground and stand on a risen or elevated platform.
  3. The winnowing basket containing the mixture is held at shoulder height then the mixture is allowed to fall by shaking the basket continuously.
  4. As a result, lighter husk particles are carried away by the blowing wind. Heavy wheat grains fall straight to the ground and form a heap near the platform for winnowing.
  5. The separated husk is used for many purposes such as fodder for cattle.

CBSE Notes Class 6 Science Chapter 3 Separation Of Substances Sepration of husk from wheat grains by winnowing

Sieving

  • The process of separating very fine particles from bigger ones by using a sieve is called sieving. In this method, a sieve having small holes at its bottom is used.
  • The sieves can be of different sizes which depends on the size of the substances to be separated. Sieving is used when components of a mixture have different sizes.
  • Some examples of separation of mixtures by sieving are as follows

Sieving allows the fine flour particles to pass through the sieve holes while the bigger impurities (Bran-outer coarse part of the grain) remain on the sieve

CBSE Notes For Class 6 Science Chapter 3 Separation Of Substances Sieving of flour to separate wheat bran and fine floor

Science Insight Sieving of wheat flour is not considered a healthy practice because wheat bran which is removed during sieving is a rich source of fibre.

  1. On a large scale, such as in a flour mill, impurities like stones and husk are removed from grains before grinding them. Usually, a hag full of wheat grains is poured on a slanting sieve.
  2. The sieve removes pieces of stones, stalks, and husks that may remain with wheat grains after threshing and winnowing Similar slanting sieves are used at construction sites to separate pebbles and stones from coarse sand.

CBSE Notes Class 6 Science Chapter 3 Separation Of Substances Pebbles and stones are removed from sand by sieving

Sedimentation, Decantation and Filtration

We observed that sometimes, separation of the mixture is not possible with the help of winnowing and handpicking as there may be lighter impurities present such as dust or soil particles. So, we use other methods for the separation of such a mixture. These methods are as follows

Sedimentation

The process of settling down of insoluble heavy solid particles in a mixture at the bottom of the vessel is known as sedimentation. For example, when we mix up sand and water in a glass and stir it with a spoon or any other tool and wait for some time, we see that the sand settles down at the bottom and clear water stands on it.

The solid settled at the bottom of the glass is known as sediment and the clear liquid above is known as supernatant.

CBSE Notes Class 6 Science Chapter 3 Separation Of Substances Sedimentation

Decantation

The process of transfer or separation of clear liquid from one vessel to another vessel without disturbing the sedimented particles is known as decantation. For example, transfer of water to another vessel from a mixture of water and sand.

CBSE Notes Class 6 Science Chapter 3 Separation Of Substances Decantation

The same principle is used for separating a mixture of two liquids, that do not mix, example oil and water can be separated from their mixture by this process.

If a mixture of such liquids, which do not mix, is allowed to stand for some time, they form two separate layers. The component that forms the top layer (i.e. oil) can then be separated by decantation.

Filtration

The process of removing insoluble solid particles from a liquid by using a filter is known as filtration. Common examples of filters used are sieve, muslin cloth, and filter paper.

Some examples of separation mixtures by filtration are as follows

  1. Separation of tea leaves from prepared tea by using a strainer.
  2. Fruit and vegetable juices are usually filtered before drinking to separate the seeds and solid particles of pulp.
  3. The method of filtration is also used in the process of preparing cottage cheese (paneer) in our homes. You might have seen that for making paneer, a few drops of lemon juice are added to milk as it boils.
  4. This gives a mixture of solid particles of paneer in a liquid. The paneer is then separated by filtering the mixture through a fine cloth or a strainer. Sometimes water supplied through taps or water that is collected from ponds or rivers may be muddy, especially after rains.
  5. Therefore, we can use sedimentation, decantation, and filtration processes in a sequence to make the water suitable for usage

Science Insight Our kidneys act as a filter to clean the blood. Waste chemicals dissolved in the blood pass through a membrane in the kidneys and are excreted as urine acts or gets filtered.

Evaporation

The process of conversion of water into its vapor is called evaporation. Heat and wind help in the evaporation of water. The process of evaporation takes place continuously, wherever water is present.

This process is used to obtain a solid material that has dissolved in water or any other liquid. The dissolved substance is left as a solid residue when all the liquid gets evaporated. For example, obtaining salt from seawater.

Sea water contains large amounts of salt dissolved in it. One of these salts is the common salt. Now, understand the way by which it can be obtained.

When seawater is allowed to stand in shallow pits, water gets heated by sunlight and slowly turns into water vapor through evaporation.

In a few days, the water evaporates completely leaving behind the solid salts. Common salt is then obtained from these solid salts by further purification.

CBSE Notes Class 6 Science Chapter 3 Separation Of Substances Obtaining Salt From Seawater

Condensation

The process of conversion of water vapor into its liquid form is called condensation. The process of condensation is the opposite of evaporation. In this process, water vapor condenses into a liquid after making contact with the cooled surface.

This method is used when the solid and liquid both need to be recovered, for example, the separation of pure water from salt solution.

Use Of More Than One Method Of Separation

We have studied some methods for the separation of substances from their mixtures. Often, only one method is not sufficient to separate the different substances present in a mixture.

In that situation, we need to use more than one of these methods, for example, the mixture containing salt, sand, and water cannot be separated by a single separation method. With the help of activity 3, we can easily understand the process of separation of a mixture with the help of more than one method.

Solution

It is a mixture in which a substance completely dissolves in a liquid. Here, the substance that dissolves in a liquid is called solute (smaller quantity), while the liquid in which solute is dissolved is called solvent (larger quantity). Solute + Solvent = Solution for example, in a salt solution, salt is the solute and water is the solvent.

Science Insight Water is considered the ‘universal solvent1 as it dissolves a large number of substances in it.

Saturated Solution

We have noticed that many substances dissolve in water and form a solution. But when more and more quantity of these substances are added to a fixed quantity of water, at a given temperature substances remain undissolved and settled down, this means that no more substance can be dissolved in the amount of water we have taken. Such a solution is called a saturated solution. In other words, a solution in which no more soluble substance can be dissolved at a given temperature is called a saturated solution.

Activity 1

Aim: To separate clear water from muddy water by using processes like sedimentation, decantation, and filtration.

Materials Required: 2 glasses, muddy water, filter paper/piece of cloth, funnel, etc.

Procedure:

  1. Take half a glass of muddy water. Let it stand for half an hour.
  2. We observe that after some time, soil settles at the bottom. This process is called sedimentation.
  3. Now, slightly tilt the glass without disturbing the sedimented soil. Let the water from the top flow into another glass. This process is called decantation.
  4. The water in the second glass is still muddy or brownish.
  5. To filter this muddy water first fold the filter paper to make a cone then fix this cone onto the funnel. Pour the muddy water through it.

CBSE Notes Class 6 Science Chapter 3 Separation Of Substances Separating the two components of a mixture by sedimentation and secantation

CBSE Notes Class 6 Science Chapter 3 Separation Of Substances Folding A Filter Paper To Make A Cone

CBSE Notes Class 6 Science Chapter 3 Separation Of Substances Set Up For Filtration

Observation: Solid particles in the mixture do not pass through the funnel and remain on the filter paper. Conclusion We can conclude that the given muddy water can be turned into clear water by using the processes of sedimentation, decantation, and filtration.

Activity 2

Aim: To separate salt dissolved in water by evaporation.

Materials Required: Salt, water, teaspoon, beaker (150 mL), burner, tripod stand, wire mesh, China dish, etc.

Procedure:

  1. Take a teaspoon of salt and dissolve it in lOOmL of water in a beaker.
  2. Heat the beaker containing salt and water as shown in.
  3. Continue the heating process until the water gets completely vapourised

CBSE Notes Class 6 Science Chapter 3 Separation Of Substances Heating A beaker Containing Salt Water Solution

Observation: After the complete vapourization, there is a white residue left behind in the beaker. Now scrap it out in a China dish and taste it. It is a salt.

Conclusion: We conclude that a substance (like salt) which is soluble in a liquid (like water) forming a salt solution, can be separated through the process called evaporation.

Activity 3

Aim: To separate salt and sand present in water.

Materials Required: Sand, salt, beakers, water, glass rod, kettle, metal plate, ice, burner, etc.

Procedure:

  1. Take a mixture of sand and salt. Keep this mixture in a beaker.
  2. Add a small quantity of water to the beaker and stir the solution with the help of a glass rod. After stirring, allow it to stand for some time.
  3. We observe that salt dissolves in water and sand settles at the bottom ofthe beaker.
  4. Separate sand from solution by decantation or filtration.
  5. Now, we need to separate salt from the remaining mixture of salt and water.
  6. Transfer this liquid to a kettle and close its lid. Heat the kettle for some time.
  7. We notice that the steam comes out from the spout of the kettle.
  8. Now, take a metal plate with some ice on it.
  9. Hold the ice plate just above the spout ofthe kettle. We will observe that when the steam comes in contact with the metal plate, it gets cooled down by ice.
  10. The water droplets fall from the plate and get collected in a separate beaker. This process is called condensation.

CBSE Notes Class 6 Science Chapter 3 Separation Of Substances Evaporation And Condensation

Observation: We have thus, separated sand (in step 4), and collected water in a separate beaker, and at the end of the activity the white residue left in the kettle is salt.

Conclusion: We conclude that processes of decantation, filtration, evaporation, and condensation are used to separate a mixture of salt, sand, and water.

Activity 4

Aim: To prepare a saturated solution of salt in water.

Materials Required: Spoon, tumbler/ glass, water, salt, glass rod, etc.

Procedure:

  1. Take a tumbler/glass and put 150 mL of water in it.
  2. Add one teaspoonful of salt to the water and stir it with a spoon or glass rod until the salt dissolves completely.
  3. Again, add a teaspoonful of salt and stir it well.
  4. Continue adding salt to water with constant stirring to dissolve it.

CBSE Notes Class 6 Science Chapter 3 Separation Of Substances Dissolving Salt In Water

Observation: After adding many spoons of salt, it is observed that some salt is left undissolved at the bottom of the tumbler even after stirring. The solution is now said to be saturated.

Conclusion: We conclude that when no more amount of solute (salt) can dissolve in the solvent (water), the solution is called a saturated solution.

Activity 5

Aim: To show the effect of heating on the saturated solution of salt and water.

Materials Required: Tumbler/beaker, water, glass rod, salt, burner, tripod stand, wire mesh, etc.

Procedure:

  1. Take some water in a tumbler or beaker.
  2. Add salt with continuous stirring with the help of a glass rod until it becomes a saturated solution.
  3. Now, add a small quantity of salt to this saturated solution and heat it.
  4. Let this hot solution cool down and observe it.

CBSE Notes Class 6 Science Chapter 3 Separation Of Substances Effect Of Heating On Saturated Solution Of Salt And Water

Observation: After heating the saturated solution, it is observed that the undissolved salt at the bottom of the beaker gets dissolved. However, after cooling down the solution, the salt appears to be settled at the bottom of the beaker again.

Conclusion: We conclude that there is an effect of heating (temperature) on the saturated solution and thus, a larger quantity of salt can be dissolved in water on heating.

CBSE Notes For Class 6 Science Chapter 2 Sorting Materials Into Groups

Sorting Materials Into Groups

Anything that can be seen and touched is called an object. We see a large number of objects around us. For example, a chair, a bullock cart, a cycle, cooking utensils, books, clothes, toys, water, stones, vegetables, plants, animals, etc.

All these objects have different shapes, colours and uses. The matter of which an object is made is called material. All objects are made up of one or more materials. For example, the chair and table are made up of wood here, wood is a material.

CBSE Notes For Class 6 Science Chapter 2 Sorting Materials Into Groups

Grouping Of Objects

Objects can be grouped according to the materials they are made up of.

  1. The same object can be made up of different materials, Example plates can be made up of steel, glass, and plastics similarly, toys can be made up of plastics, rubber, metal, etc.
  2. Different objects can be made up of the same material, Example wood, which can be used to make chairs, tables, beds, ploughs, etc. Similarly, leather can be used to make belts, wallets, purses, bags, etc.

We can also separate materials into several groups based on similarities or differences in their properties.

Read and Learn More Class 6 Science Notes

Properties Of Materials

Different materials have different properties. Material to make an object is chosen depending on its properties and the purpose for which the object is to be used.

For example, we make a tumbler from materials such as glass, plastic or steel because all these materials have the property of storing water or other liquids. We cannot make a tumbler from a piece of cloth because it cannot hold water.

Similarly, it would not be a wise idea to use paper-like materials for cooking vessels. Some of the properties of materials based on which they can be chosen for different purposes are explained below.

CBSE Notes For Class 6 Science Chapter 2 Sorting Materials Into Groups Properties Of Materials

Appearance

Some materials may appear shiny, while some might seem dull. For example, gold, silver, aluminium, and iron shine, while wood, plastic, paper, and rubber are dull.

Materials which appear shiny are said to have lustre (or in Hindi chamak). These materials often lose their shine due to the action of air and moisture. Flowevcr, their shine reappears after rubbing or cutting the surface. That’s why lustre is often noticed on freshly cut ends.

Dull materials remain the same even after rubbing or cutting them. Some materials differ in colour, glow and texture of their surfaces as well, (i.e. rough or smooth) and can be grouped accordingly.

Hardness and Softness

  1. Those materials which cannot be compressed or scratched easily are called hard materials. For example, iron, steel, wood, stone, etc.
  2. Those materials which can be easily compressed or scratched are called soft materials. For example, cotton, wool, clay, butter, etc.
  3. Science Insight Diamond is the hardest known material. It cannot be scratched by other materials and only be cut by the diamond itself.

CBSE Notes For Class 6 Science Chapter 2 Sorting Materials Into Groups

Soluble or Insoluble

Solubility is defined as the ability of a solid, liquid or gaseous substance to dissolve in a solvent (usually a liquid). Based on solubility in water, the material can be soluble or insoluble. Those materials which are completely dissolved or disappear in water are called soluble materials.

Those materials which are not dissolved or disappear in water even after stirring for a long time are called insoluble materials.

Water plays an important role in the functioning ofour body because it can dissolve a large number of substances. Solubility of Solids in Water Some solids completely dissolve or disappear in water, for example, salt, sugar, etc.

Some solids do not dissolve or disappear in water, for example, sand, dust, chalk powder, plastic, etc. They settle down or float on water.

CBSE Notes For Class 6 Science Chapter 2 Sorting Materials Into Groups Salt Is Soluble In Water And Sand Is Insoluble In Water

Solubility of Liquid in Water

Some liquids get completely mixed or dissolve in water, for example, vinegar, etc. On the other hand, some liquids do not mix with water and form a separate layer when kept aside for some time, for example, mustard oil, coconut oil, etc.

Solubility of Gases in Water

Some gases are soluble in water while others are not. For example, oxygen gas dissolves in water and is very important for the survival of animals and plants that live in water.Carbon dioxide gas also dissolves in water and helps in photosynthesis in underwater plants. Some gases like nitrogen and hydrogen are not dissolved in water.

Objects may Float or Sink in Water

Some materials that are not mixed or dissolved in water either float on the surface of the water or sink to the bottom of the tumbler.

The property of a material to float on the surface of the water is called flotation and these materials are called floating materials, Example dried leaves fall on the surface of a pond. These materials are lighter than water.

The heavy materials that sink easily to the bottom of the tumbler are called sinking materials, for Example stones thrown into the pond, drops of honey in water, etc. These materials are heavier than water.

CBSE Notes For Class 6 Science Chapter 2 Sorting Materials Into Groups Some Objects Floats On the Surface Of Water While Others Sink Into it

Science Insight Ships and boats float higher in the salty sea water than they do in the freshwater of lakes and rivers. This is because salt in seawater makes it denser than freshwater.

Transparency

The property of a material which allows the light to pass through it is called transparency. Based on this property, materials can be classified as follows

1. Transparent Materials

The materials through which an object can be seen are called transparent materials, for example, glass, water, some plastics, etc.

2. Translucent Materials

The materials through which an object can be seen, but not clearly, are called translucent materials, for example, oiled paper, muslin cloth, frosted window, etc.

3. Opaque Materials

The materials through which we are not able to see anything are called opaque materials, for example, wood, cardboard, brick, metal, etc.

CBSE Notes For Class 6 Science Chapter 2 Sorting Materials Into Groups Transparency

Importance Of Sorting Materials Into Groups

In everyday life we often group materials for our convenience as grouping of materials helps us to locate them easily.

For example, in the library, books are arranged in alphabetical order. In grocery stores, household items and eatables items are placed separately. The grouping of materials makes it convenient to study their properties.

Activity 1

Aim: To separate the shiny materials from paper, cardboard wood, copper wire, aluminium sheet, and chalk.

Materials Required: Paper, cardboard, wood, copper wire, aluminium sheet, chalk.

Procedure:

  1. Collect some small pieces of given materials.
  2. Observe the shine in all materials.
  3. You can rub the surface of materials or cut to see if it
    has lustre or not.
  4. Separate the shiny materials.
  5. Note your observations in the table given below.

Sorting Materials Into Groups Activity 1 Given materials Shiny materials

Observation:

CBSE Notes For Class 6 Science Chapter 2 Sorting Materials Into Groups Activity 1 Given materials Shiny materials.

Conclusion: Some of the given materials like copper wire aluminium sheets, have a shiny appearance while others have a dull appearance. The materials with shiny appearance are said to have lustre.

Activity 2

Aim: To observe whether different solid materials (like sugar, salt, chalk powder, sand, and sawdust) are soluble or insoluble in water.

Materials Required: Beakers, spoon, water and solid materials like sugar, salt, chalk powder, sand, and sawdust.

Procedure:

  1. Collect samples of some solid materials.
  2. Take five beakers. Fill each of them up to two-thirds volume with water.
  3. Add a small amount of each given material, in different beakers separately.
  4. Stir the contents of each beaker with the help of a spoon.
  5. Note your observations in the table given below

Sorting Materials Into Groups Activity 2 Solid Materials Disappers In Water Does not Disapper In Water

Observation

CBSE Notes For Class 6 Science Chapter 2 Sorting Materials Into Groups Activity 2 Solid Materials Disappers In Water Does not Disapper In Water.

Conclusion: You will notice that some solid materials have completely disappeared and thus, are soluble in water. Whereas other solid materials like sand, chalk powder, and sawdust do not disappear and are thus, insoluble in water.

Activity 3

Aim: To observe whether liquid samples, like lemon juice, vinegar, mustard oil, coconut oil, and kerosene are soluble or insoluble in water.

Materials Required: Glass tumbler, water, a sample of vinegar, lemon juice, mustard oil, coconut oil, and kerosene.

Procedure:

  1. Collect given samples of liquids like lemon juice, vinegar, etc.
  2. Take a glass tumbler. Fill it half with water.
  3. Add a spoonful of one liquid to this and stir it well,
  4. Let it stand for five minutes.
  5. Observe whether the liquid mixes with water.
  6. Repeat the same procedure with other given liquids also.
  7. Write observations in the table given below.

Sorting Materials Into Groups Liquid Mixes Well Does Not Mix in water

Observation:

CBSE Notes For Class 6 Science Chapter 2 Sorting Materials Into Groups Liquid Mixes Well Does Not Mix in water.

Conclusion: We notice that some liquids like vinegar, and lemon juice get completely mixed with water.

So, these are soluble in water while liquids like mustard oil, coconut oil, and kerosene do not get mixed with water and form a separate layer when kept for some time. So, these are insoluble in water.

Activity 4

Aim: To differentiate between translucent and opaque materials.

Materials Required: Electric bulb, sheet of paper, oil, torch.

Procedure:

  1. Take a sheet of paper.
  2. Look through it towards a lighted bulb.
  3. Make a note of your observations.
  4. Now, put 2-3 drops of some oil and spread it on a sheet of paper.
  5. Look again towards the lighted bulb through it.
  6. Note your observations again.
  7. Now, take a torch and cover the glass of the torch with your palm in a dark place.
  8. Switch on the torch and observe the other side of your palm.

Observation:

  1. When we look at the lighted bulb through the paper, we do not see any light.
  2. When we spread some oil on the paper and look at the lighted bulb through it, we see some light, but not as clearly.
  3. When we cover the glass of the torch with our palm and switch on the torch, we see a small amount of light on the other side of the palm.

Conclusion: We find that materials, in which an object can be seen, but not clearly are called translucent.

Materials which does not allow any light to pass through are called opaque. Hence, in the above observation, paper is an opaque material while paper spread with oil and palm is translucent.

CBSE Notes For Class 6 Science Chapter 11 Air Around Us

Air Around Us

CBSE Notes For Class 6 Science Chapter 11 Air Around Us

Air Around Us Properties Of Air

Some of the properties of air are given below.

  • Air is invisible, and it can only be felt.
  • It occupies space.
  • It is colorless, odourless, and transparent.
  • It takes the shape and odor of the object or place where
  • It is present in.
  • It is a mixture of different gases and another particle

Presence Of Air

Atmosphere

The thin layer of air surrounding the Earth is called the atmosphere. This thin layer extends up to many kilometers above the surface of the Earth. It filters out harmful radiations and other particles entering into the Earth’s atmosphere.

We know that mountaineers carry oxygen cylinders with them while climbing high mountains. This is necessary because the amount fair reduces as we move higher in the atmosphere. At higher altitudes, the level of oxygen is very low creating breathing problems

Science Insight:

A thin layer of ozone is present in the upper atmosphere. It protects the Earth by blocking harmful rays coming from the Sun.

Read and Learn More Class 6 Science Notes

Composition Of Air

Air is a mixture of many gases. The major components of air are nitrogen (78%) and oxygen (21%). The remaining 1% contains carbon dioxide, water vapor, argon and a few other gases, along with dust and smoke. The composition of dust and smoke varies from time to time and place to place

CBSE Notes For Class 6 Science Chapter 11 Air Around Us Composition Of Air

Let s study these components of air in detail

1. Water Vapour

It is the water present in gaseous form in the air and can be formed through the process of evaporation.

  • This is why when air comes in contact with cool surfaces, these vapors condense into drops of water,
  • Example:  Appearance of water drops on the surface of a glass containing ice during summer. Water vapor in air is important for the water cycle in nature.

2. Oxygen

  • It is an essential component present in the air. Survival of all living beings on land and in water is because of oxygen.
  • It is a vital part in the respiration process in all living beings, and also a supporter of burning.
  • It does not burn but is required in the burning of a substance or a fuel.

Presence of Oxygen in Water and Soil:

  • Animals and plants living in water are aquatic organisms. These organisms use oxygen, which is dissolved in water for breathing.
  • Those organisms which live in soil and plants (through their roots) use the air present in between the space of soil particles.

3. Nitrogen

It is a major component of air. It is required by both plants and animals for their growth, but they are not able to absorb the nitrogen directly from the air. Nitrogen is first converted to nitrate only, then plants absorb it from the soil. Animals absorb it by consuming food prepared by plants. Unlike oxygen, nitrogen does not support burning.

4. Carbon Dioxide (CO2)

It is also an essential component of air like oxygen that makes a small composition in the air plants consume carbon dioxide while making their food by the process of photosynthesis.

  • On the other hand, we take in oxygen and give out carbon dioxide during respiration. Burning of plant and animal matter also uses oxygen, and in turn, carbon dioxide is given out.
  • We feel suffocated if we burn something in a closed room. This is due to the excess of CO2 present in the room. So, it is advisable not to burn dry leaves and discarded remains of the crop, which causes pollution.
  • It does not support burning and can be used as a fire extinguisher to put off the fire.

5. Dust and Smoke

The burning of fossil fuels produces smoke. It contains few gases and fine dust particles which are harmful to living organisms.

  • Long chimneys could be seen in factories. It takes the smoke and dust particles away from our noses, but in turn, it is harmful to birds flying up in the sky.
  • Dust particles are always present in the air in winter, we observe a beam of sunlight that filters through the trees.
  • In which dust particles appear to dance merrily. Fine hair and mucus present inside the nose prevent the dust particles when we breathe.

Why do traffic policemen wear masks?

The traffic policemen who regulate traffic at a crowded city road crossing often wear masks. The traffic policemen wear masks to protect themselves from the smoke containing harmful gases which are emitted by the vehicles moving around them.

CBSE Notes For Class 6 Science Chapter 11 Air Around Us

Replacement Of Oxygen In Atmosphere

All living organisms consume oxygen present in the air. The process of respiration by plants and animals uses oxygen present in the air. It is constantly replaced by plants through the process of photosynthesis.

  • In this process, plants make their food, and oxygen is produced. Plants also consume oxygen for respiration, but they produce more of it than they consume.
  • That is why, we say, plants produce oxygen.
  • Animals cannot live without plants. The balance of oxygen and carbon dioxide in the atmosphere is maintained through respiration and photosynthesis. This shows the interdependence of plants and animals.

Uses of Air

We have seen how valuable the resource of air is. All of its components are vital for life on Earth.

Here, some uses of air are given below:

  • It exerts pressure on objects that come in its way.
  • It regulates temperature.
  • Wind is used to rotate windmills. It is used for various purposes like drainage water from tube wells, running flour mills, generating electricity, etc.
  • It is used by living organisms for breathing.
  • It is used to inflate the tires of vehicles.
  • It is used for the winnowing process.
  • It helps in the traveling of sound and smell as when air moves, it carries sound and smell to a distance
  • It helps in the movements of sailing yachts, gliders, parachutes, and airplanes. Birds and insects can fly due to the presence of air.
  • It also helps in the dispersal of seeds and pollen of flowers of several plants.
  • It plays an important role in the water, nitrogen, and oxygen cycle.

Activity 1

Aim:

To show the presence of air with the help of a firkin.

Materials Required:

Paper, stick, scissors, etc.

Procedure:

  1. Make a firki by using a paper strip.
  2. Hold the stick of the firki and move it in different directions.

CBSE Notes For Class 6 Science Chapter 11 Air Around Us Making A Simple Firki

Observation: 

We will observe that the firki starts rotating. The firki moves/rotates when the air strikes its blades.

Conclusion:

We conclude that air is present around us

Activity 2

Aim:

To show that air occupies space using an empty bottle.

Materials Required:

Empty glass bottle, container, filled with water etc.

Procedure:

  • Take an empty glass bottle.
  • Now, hold the bottle in an inverted position (with its open mouth facing downwards) in a container filled with water.
  • Observe if water enters the bottle.
  • Now, tilt the bottle in water and observe it.

CBSE Notes For Class 6 Science Chapter 11 Air Around Us To Show That Air Occupies Space

Observation:

  • The water does not enter into the inverted glass bottle.
  • In tilted glass bottle. Air present in the bottle goes out in the form of air bubbles. As the air from the ott e pes, water starts entering the glass bottle and occupies the place of air.

Conclusion:

We conclude that the glass bottle which appears to be empty is filled with air.

Activity 3

Aim:

To demonstrate the presence of oxygen in air which supports burning.

Materials Required:

2 candles, matchbox, 2 glass

Procedure:

  • In the presence of your teacher, fix two small candles of the same size. Light both the candles.
  • Cover one of the candles with an inverted glass and observe

CBSE Notes For Class 6 Science Chapter 11 Air Around Us Has Oxygen

observation:

It is observed that the candle covered with a glass tumbler was extinguished after some time whereas the other candle continued burning

Conclusion:

We concluded that air contains some amount of oxygen and it supports burning

Activity 4

Aim:

To show the presence of dust particles in the air.

Materials Required:

Black curtains or black chart papers.

Procedure:

  • Find a room in a school/home.
  • Close all the doors and windows with the help of black chart paper or black curtains.
  • Make a small hole in the black chart I have fixed on the window, facing the Sun, and observe.

Observing the presence of dust in the air with sunlight:

CBSE Notes For Class 6 Science Chapter 11 Air Around Us Observing Presence Of Dust In Air With Sunlight

Observation:

  • A thin beam of sunlight enters the room through the small hole made in the chart.
  • We could see the tiny dust particles moving in the beam of light in the dark room.

Conclusion:

  • We conclude that air also contains dust particles.
  • The presence of dust particles in the air varies from time to time and from place to place.

Activity 5

Aim:

To show the presence of dissolved air in water.

Materials Required:

Tumbler/beaker, water, tripod stand, burner.

Procedure:

  • Take a number/beaker filled with water and keep it on a tripod stand
  • Heat the water slowly by using a burner.

CBSE Notes For Class 6 Science Chapter 11 Air Around Us Water Contains Air

Observation:

Before the water begins to boil, tiny bubbles appear on the inner surface of the tumbler/beaker. These bubbles are of air dissolved in water.

Conclusion:

We conclude that water contains dissolved air and when it is warmed, air comes out in the form of bubbles

Activity 6

Aim:

To show that soil contains trapped air.

Materials Required:

Small jar, water, soil.

Procedure:

  • We take a small jar filled with water.
  • Add a handful of soil into the jar and observe the changes that occur.

CBSE Notes For Class 6 Science Chapter 11 Air Around Us Soil Has Air In It

Observation:

While adding the soil into the jar, air bubbles observed which are formed in water. This shows that the soil contains some air trapped in between its soil particles.

Conclusion:

We conclude that soil contains trapped air, which helps the organisms to survive that live inside the soil. Also, the roots of plants respire by using this air.

CBSE Notes For Class 6 Science Chapter 10 Fun With Magnets

Fun With Magnets


CBSE Notes For Class 6 Science Chapter 10 Fun With Magnets

Fun With Magnets Magnet

The substances having the property of attracting iron are known as magnets. In our daily life observations, we have often seen certain stickers on the doors of refrigerators. The white iron boards in schools often have dusters that can be stuck to them. A pin holder has lots of pins stuck to it and a crane picking up pieces of iron from waste, etc All these objects have a special substance called a magnet in them. Nowadays, magnets are used to make mobile devices, telephones, televisions, etc

Picking up pieces of Iron from waste:

CBSE Notes For Class 6 Science Chapter 10 Fun With Magnets Picking Up Pieces Of Iron From Waste

Some common Items that have magnets Inside them:

CBSE Notes For Class 6 Science Chapter 10 Fun With Magnets Some Common Items That Have Magnets Inside Them

Discovery of Magnet

  • The magnet was discovered accidentally. There was a shepherd named Magnes who lived in ancient Greece. He used to take his herd of sheep and goats to the nearby mountains for grazing. He would take a stick with him to control his herd. The stick had a small piece of iron attached at one end.
  • One day, he was surprised to observe that he had to pull hard to free his stick from a rock where he used to go with his sheep and goats. It seemed as if the stick was being attracted by the rock
  • The rock was a natural magnet that attracted the iron tip of his stick. So, after the name of a shepherd, the rock was named as magnetite and magnetite contains iron.
  • Some people believe that magnetite was first discovered at a place called Magnesia

Read and Learn More Class 6 Science Notes

CBSE Notes For Class 6 Science Chapter 10 Fun With Magnets A Natural Magnet On A Hillside

Natural Magnet and Artificial Magnet

  • The magnet that is found in nature is known as natural magnet,
  • Example: Magnetite and lodestone, whereas the magnet that can be made by magnetising materials like iron, cobalt, nickel, etc., is known as an artificial magnet or man-made magnet.
  • Nowadays, artificial magnets are prepared in different shapes, e.g. bar magnet, horse-shoe magnet, cylindrical or ball-ended magnet

CBSE Notes For Class 6 Science Chapter 10 Fun With Magnets Magnets Of Different Shapes

Magnetic and Non-Magnetic Materials

  • All the materials are not attracted by magnets. Magnets attract only certain materials. The substances which get attracted by the magnet are called magnetic materials,
    • Examples: Iron, steel, nickel, and cobalt.
  • While those substances which are not attracted by the magnet are called non-magnetic materials,
    • Examples:  Rubber, plastic, stainless steel, feather, and leather.
  • We can see this in daily life observation,
    • Example:  When a needle slips from our hand on the floor. To find it, a magnet. Since a needle is made of iron, it can be attracted by a magnet

Note: Non-magnetic materials cannot be magnetised. It means that non-magnetic materials cannot be converted into magnet

CBSE Notes For Class 6 Science Chapter 10 Fun With Magnets

Poles of Magnet

  • When we bring a magnet close to iron filings, we see that iron filings get attracted toward a magnet. If we observe, we will find that most of the iron filings stick at the two free ends of a magnet. These free ends are called the poles of a magnet. Poles of the magnet are the regions of strongest magnetism.
  • All magnets have two poles north pole and south pole, whatever their shape may be. Usually, north (N) and south (S) poles are marked on the magnets.
  • The north pole and south pole of a magnet can’t exist independently or cannot be separated. If a magnet is broken into two or more pieces, each of them will have a north pole and south pole

CBSE Notes For Class 6 Science Chapter 10 Fun With Magnets Poles Are Marked On The Magnets

Finding Direction

  • An interesting property of a magnet is that a freely suspended bar magnet always comes to rest in a north-south direction.
  • The end ofthe magnet that points towards the north is called the north-seeking end or north pole of the magnet and the other end that points towards the south is called south seeking end or south pole of the magnet
  • In early centuries, t is property of magnets was very useful for travelers. They used to suspend magnets with a thread to find directions.

CBSE Notes For Class 6 Science Chapter 10 Fun With Magnets Freely Finding Directions

Using the Sun for Finding Directions

  • By using the direction of the rising sun in the morning, we can find out the rough direction towards the east. If we stand facing east, then our left will be north.
  • It may not be very exact but it will help to make out all the directions as

CBSE Notes For Class 6 Science Chapter 10 Fun With Magnets Using The Sun For Finding Directions

Compass

A compass is usually a small box with a glass cover on it. A magnetised needle is pivoted inside the box, which can rotate freely. It has a dial with directions marked on it as shown in the figure

CBSE Notes For Class 6 Science Chapter 10 Fun With Magnets A Compass

Science Insight:

Earth also behaves like a giant magnet. The magnetic compass lines up with the earth’s magnetic poles such that the north pole of the magnetic needle always points to the earth’s north pole and vice-versa.

To find the directions using a compass

The compass is placed at a place where we wish to know the direction. The compass needle points in the north-south direction, when it comes to rest. The dial of the compass is rotated and aligned with the north-south axis of the needle. This gives the north-south direction.

Make Your Magnet

There are several ways to make a magnet from a magnetic material. One of the simplest ways to make a magnet is given below.

  • First of all, take an iron bar, which is to be made of a magnet, and keep it on the wooden table.
  • Now, take a bar magnet and try to hold it with one end with your hand.
  • Keep the other end in touch with the one end of the bar.
  • Now, move the magnet toward the other end of the iron bar.
  • Now, lift the magnet at the end and place it at the end from where you have started.
  • Repeat this process about 30-40 times.
  • Bring a pin or some iron filings near the iron bar to check whether it has become a magnet. If not continue the process for some more time.
  • Remember that the pole of the magnet and the directions of its movement should not change.

CBSE Notes For Class 6 Science Chapter 10 Fun With Magnets Making Your Own Magnet

Attraction And Repulsion Between Magnets

  • When north-north or south-south poles of two magnets come close, then they repel each other, i.e., it can be stated that like poles repel each other
  • On the other hand, when the north-south or south-north poles of two magnets come closer, then they attract each other, i.e. it can be stated that unlike poles attract each other.
  • The attractive or repulsive force that is exerted between the poles of a magnet is also known as a magnetic force.

CBSE Notes For Class 6 Science Chapter 10 Fun With Magnets Like Poles Repel And Unlike Poles Attraction

Science Insight:

Maglev train works on the principle of attraction and repulsion between magnets. In this, one set of magnets is used to repel and push the train up off the track and another set is used to move the elevated train ahead

A Few Cautions for Magnet

There are some ways to keep magnets safe

  • Magnets lose their properties if they are heated, hammered, or dropped from some height.
  • Magnets also become weak, if they are not stored properly.
  • To keep them safe, bar magnets should be kept in pairs with their unlike poles on the same side.
  • Keep magnets away from cassettes, mobiles, television, music systems, CDs, and computers.
  • They must be separated by a piece of wood while two pieces of soft iron should be placed across their ends.

CBSE Notes For Class 6 Science Chapter 10 Fun With Magnets Store Your Magnets Safely

Activity 1

Aim:  To observe the effect of a magnet.

Material Required:  A magnet, a paper cover, a cup, a thread stand, and a metal clip

Procedure:

  • Take a paper cup and fix it on a stand with the help of a clamp
  • Place a magnet inside the cup and cover it with paper, so that the magnet is not visible.
  • Attach a thread to a clip made of iron and fix the other end ofthe thread at the base ofthe stand
    (remember to keep the length of the thread sufficiently short).
  • Bring the clip near the base of the cup. The clip will rise in the air without support

CBSE Notes For Class 6 Science Chapter 10 Fun With Magnets Effect Of Magnet Paper Clip Hanging

Conclusion:  We have concluded that a magnet is a substance that has the property to attract iron.

Activity 2

Aim:

To identify magnetic and non-magnetic materials using a magnet

Material Required:

A magnet, different types of materials Material Required A magnet, different types of materials

Procedure:

  • Hold a magnet and bring it close to each one of these materials.
  • Observe which materials get attracted towards the magnet.
  • Prepare a table of those materials that are attracted by a magnet.

CBSE Notes For Class 6 Science Chapter 10 Fun With Magnets Prepare A Table Of Those Materials

CBSE Notes For Class 6 Science Chapter 10 Fun With Magnets Materials Objects

Conclusion:

We have concluded that objects which are made of iron, copper, etc. (magnetic materials), are attracted by magnets. On the other hand, objects which are made of plastic, paper, cloth, etc. (non-magnetic materials), are not attracted by a magnet

Activity 3

Aim: To identify the amount of iron particles in the soil of different areas

Material Required: A magnet, samples of the soil from a different area

Procedure:

  • Rub a magnet In the sand or soil. You will observe some particles of soil stick to the magnet.
  • Gently shake the magnet to remove the particles of soil.
  • You will observe some particles still stick to It. These might be small iron pieces.

Prepare a table for different samples of soil:

CBSE Notes For Class 6 Science Chapter 10 Fun With Magnets Prepare A Table For Different Samples Of Soil

Conclusion:  We have concluded that different areas have different amounts of iron particles in their soil

CBSE Notes For Class 6 Science Chapter 10 Fun With Magnets Many And Few And No Iron Fillings

Activity 4

Aim:  To observe that the magnetic strength is maximum at the poles.

Material Required:  A magnet, and some iron filings.

Procedure:

  • Take some iron filings on a paper sheet.
  • Put a magnet on the sheet and smoothly roll it on the iron filings
  • Wait for a few seconds, we will find that the maximum number of iron filings are attracted at the end of get and a very smaller amount at the center

CBSE Notes For Class 6 Science Chapter 10 Fun With Magnets Iron Filings Sticking A Bar Magnet

Conclusion: We have concluded that the magnetic strength of the magnet is maximum at the poles.

Activity 5

Aim:

To show the directive property of a magnet. Material Required A magnet, a wooden stand, and a thread.

Procedure:

  • Hang the magnet with the thread freely in the air. When it comes to rest, mark two points on the ground to show the position of the ends of the magnet.
  • Rotate the magnet by gently pushing one end in any direction and when it comes to rest, mark the position of the ends of a magnet.
  • Repeat the above step, and the magnet always comes to rest in the same direction, i.e. north-south direction.
  • Repeat this activity with an iron bar, a plastic, or a wooden scale. You will find that the observation is different for every step.

CBSE Notes For Class 6 Science Chapter 10 Fun With Magnets A Freely Suspended Bar Magnet

Conclusion: 

We have concluded that a magnet has directive properties. It is always directed to the north-south direction

Activity 6

Aim: To make a simple magnetic compass. Do opposite poles attract each other?

Material Required: A cork, a magnetised needle, and a water bowl.

Procedure:

  • Insert the magnetised needle through a small piece of cork.
  • Let the cork float in water in a bowl. Make sure that the needle does not touch the water.
  • Note the direction in which the needle points.
  • Rotate the cork, with the needle fixed in it in different directions.
  • Note the direction again in which the needle points.
  • You will find that the needle always points in the same direction.

CBSE Notes For Class 6 Science Chapter 10 Fun With Magnets A Compass In A Cup

Conclusion:

We have concluded that magnetized needle always comes at rest in the north-south direction of the earth.

Activity 7

Aim: To observe attraction and repulsion between magnets.

Material Required: Magnets, toy cars.

Procedure:

  • Take two small toy cars and label them A and B.
  • Place a bar magnet on top ofeach car along its length and fix them with rubber bands such that, in car A, the south pole of the magnet is towards its front, and in car B, die north pole of the magnet is towards its front.
  • Place both cars close to one another. You will find that the cars are moving towards each other.
  • Now, place the cars close to each other such that the rear side of car A faces the front side of car B. You will find the cars are moving away from each other.
  • Repeat this activity by changing the position of the car and observing it.

CBSE Notes For Class 6 Science Chapter 10 Fun With Magnets Do Opposite Poles Attract Each Other

Positions of the car:

CBSE Notes For Class 6 Science Chapter 10 Fun With Magnets Positions Of The Cars

Conclusion: 

We have concluded that like poles repel each other and unlike poles attract each other.

CBSE Notes For Class 6 Science Chapter 1 Components Of Food

Components Of Food

Each food item is usually made up of one or more ingredients, which we get from plants or animals. These ingredients contain some components, which are needed by our body. These components are known as nutrients.

Thus, nutrients are the substances which are required by our body to grow, function properly and stay healthy.

CBSE Notes For Class 6 Science Chapter 1 Components Of Food

The food items based on the presence of these nutrients can be classified as

  1. Energy-giving foods These food items are mainly rich in carbohydrates and fats.
  2. Body-building foods These food items are rich in proteins.
  3. Protective foods These food items are rich in vitamins and minerals.

Apart from these, our body requires water and roughage to function properly

Read and Learn More Class 6 Science Notes

Science Insight Our nails, hair and skin are made up of keratin protein. The human brain is composed of about 60% fats and it relies on dietary fats for optimal function.

Vitamins

Some vitamins, their sources and their functions are tabulated below.

CBSE Notes For Class 6 Science Chapter 1 Vitamins

Minerals

CBSE Notes For Class 6 Science Chapter 1 Minerals

Science Insight Zinc is an essential mineral for our sense of taste and smell. Its deficiency can create problems with the ability to taste and smell food.

Water

Water performs the following functions

  • It helps our body to absorb nutrients from food.
  • It helps in throwing out waste materials from the body as urine and sweat.

Lack of water in the body causes dehydration. Severe dehydration can even cause death.

Roughage (Dietary Fibre)

It is the fibrous matter present in food that cannot be digested. Roughage is mainly comprised of an indigestible carbohydrate called cellulose, which is present in plants.

Balanced Diet

The total amount of food that a person eats during the entire day is called their diet. A balanced diet is a diet that contains the proper amount of all the nutrients along with a good amount of roughage and water.

It provides the body with all the energy and fulfils various nutrient requirements needed for proper functioning. A balanced diet should include foods that are

  1. Energy-rich Fats and carbohydrates like butter, rice and chapatis.
  2. Body-building Proteins like pulses, peas and fish.
  3. Protective Vitamins, and minerals containing curd, vegetables and fruits.

CBSE Notes For Class 6 Science Chapter 1 A balanced Diet

A balanced diet is not the same for everyone. It depends on age, sex and the type of work that one does. This can be explained by the following examples

  1. In early childhood, the child grows rapidly. So, he or she needs more proteins.
  2. Nursing mothers and pregnant women also need more protein to serve the needs of the growing baby.
  3. A hard worker, i.e. labourer needs more energy, which he can get by eating more fats and carbohydrates

Loss of Nutrients in Food

Eating the right kind of food is not enough. It should also be cooked properly so that its nutrients are not lost. We all know that cooking improves the taste of food and makes it easier to digest. At the same time, cooking also results in the loss of certain nutrients.

So, while cooking we should remember the following important things

  • The skins of many vegetables and fruits contain vitamins and minerals.
  • If the vegetables and fruits are washed after cutting or peeling them, it may result in the loss of some vitamins.
  • Repeated washing of rice and pulses may result in the loss of some vitamins and minerals present in them.
  • Many useful proteins and minerals are lost if excess water is used during cooking and is later thrown away.
  • Vitamin C gets easily destroyed by heat during cooking.

CBSE Notes For Class 6 Science Chapter 1 Components Of Food

Deficiency Diseases

The diseases which occur due to the lack of specific nutrients in our diet over a long period are called deficiency diseases. When a person eats food that does not contain a particular nutrient over a long period, then the person may suffer from its deficiency.

  • A deficiency of one or more nutrients can cause diseases or disorders in our body.
  • Due to the deficiency of one or more nutrients, a person shows the following symptoms
  • Deficiency of protein in a person may cause stunted growth, swelling of the face, discolouration of hair, skin disease and diarrhoea.
  • Deficiency of both proteins and carbohydrates affects a person’s growth and it may stop completely. Such a person becomes so lean and weak that he/she may not even be able to walk.
  • A deficiency of vitamins and minerals may also result in certain diseases,

Some Diseases are caused by the deficiency of vitamins 

CBSE Notes For Class 6 Science Chapter 1 Some Diseases Caused By The Deficiency Of Vitamins

CBSE Notes For Class 6 Science Chapter 1 Some Diseases Caused By The Deficiency Of Minerals

All deficiency diseases may be prevented by taking a balanced diet

Food is said to be fortified when essential vitamins and minerals are added to common foods like rice, wheat, oil, milk and salt to increase their nutritional value. Given alongside is the logo for fortified foods as per standards by FSSAI.

Science Glossary

  1. Balanced diet A diet that contains an adequate amount of all nutrients, for healthy functioning of the body.
  2. Beriberi Disease is caused by a deficiency of vitamin B1. Carbohydrates provide energy to our body. It includes starch and sugar. Energy It is the capacity to do work.
  3. Fats These are the storehouse of energy in our body. Nutrients The fundamental components of food, that provide nourishment to the body.
  4. Proteins These are body-building foods that help in repairing and maintaining the body tissues.
  5. Roughage These are dietary fibre, which forms bulk and helps in the removal of undigested food. Starch is a complex carbohydrate.
  6. Scurvy Disease is caused by a deficiency of vitamin C. Vitamins and minerals These are protective food that helps our body to fight against diseases.

Activity 1

The presence of carbohydrates in the food

Aim: To test the presence of starch in a food item, for Example potato.

Materials Required: Potato, knife, tincture iodine, water, test tube, dropper and plate.

Procedure:

  1. Firstly, we will prepare an iodine solution by adding a few drops of tincture iodine to a test tube half-filled with water. Then mix it thoroughly.
  2. Now, cut a slice of potato with the help of a knife and place it on a plate.
  3. Add 2 to 3 drops of dilute iodine lypS solution to the potato sample. Testing of starch

Observation: We will observe that the colour of the potato slice changes to a blue-black colour.

Components Of Food Testing Of Starch

Conclusion: The appearance of a blue-black colour confirms the presence of starch in the given food sample, i.e. potato.

Activity 2

We can test the presence of protein in food

Aim: To test the presence of proteins in a food material, Example paneer.

Materials Required: Paneer, copper sulphate, test tube, water, caustic soda, dropper, test tube stand, mortar and pestle.

Procedure:

  1. Prepare the copper sulphate solution by dissolving
  2. 2 gram of copper sulphate in 100 mL of water.
  3. Dissolve 10 grams of caustic soda in 100 mL of water to prepare caustic soda solution.
  4. Now grind the food material, i.e. paneer into a thin paste, with the help of mortar and pestle. Transfer the paste to a clean test tube.
  5. Add 10 drops of water to this test tube and shake it well.
  6. Now, using a dropper add two drops of freshly prepared copper sulphate solution.
  7. Then add ten drops of caustic soda solution to the test tube and shake it well.
  8. Place the test tube on the test tube stand for a few minutes.

Observation: After a few minutes, we will observe that the content of the test tube turns violet.

Conclusion: The change of colour in the test tube to violet signifies the presence of protein in the given food material, i.e. paneer.

Activity 3

The presence of fat in the food can be identified by a simple test 

Aim: To test the presence of fat in food material, for example, butter.

Materials Required: Butter, brown paper a source of light (bulb), knife.

Procedure:

  1. Cut a small quantity of food material.
  2. Put the food material on brown paper and rub over it.
  3. Now, hold this brown paper towards a source oflight. Observation Under the light will observe a bright, greasy patch on the paper.

Conclusion: The greasy patch confirms the presence of oil, i.e. fat in the food item.

CBSE Notes For Class 6 Science Chapter 9 Electricity And Circuits

Electricity And Circuits

CBSE Notes For Class 6 Science Chapter 9 Electricity And Circuits

Electricity And Circuits Electric Cell

An electric cell is a device that produces electricity from chemicals stored inside it A device that is used to produce a small amount of electricity by chemical reactions is known as an electric cell.

  • There is a wide utilization of these cells such as in alarm clocks, wristwatches, cameras, and many other devices.
  • The electric cell produces electricity till the whole of its chemical gets used. When the chemicals inside the cell are exhausted, the cell needs to be replaced by a new one.

Structure of Electric Cell

A common electric cell is a cylindrical cell as shown in

CBSE Notes For Class 6 Science Chapter 9 Electricity And Circuits Structure Of Electrical Cell

  • A metal cap on the upper side, a positive terminal (+)•
  • A metal disc on the lower side, a negative terminal (-)
  • The chemicals ammonium chloride and zinc chloride present inside between the two terminals are called electrolytes.

Read and Learn More Class 6 Science Notes

Note:  Terminal is a point at which either current starts or reaches finally after flowing.

  • For current to flow, the positive terminal must be connected to the negative terminal and this polarity must be maintained.
  • An electric cell is a single unit but when several electric cells are used together, it is called a battery, which can be used to power bigger devices.

Why should you never connect the positive (+) and negative (-) terminals of the cell directly?

Never join the two terminals of the electric cell without connecting them through a switch and a device like a bulb. If you do so, the chemicals in the electric cell get used up very fast and the cell stops working.

Electric Bulb

A bulb is a device that converts electrical energy into light and heat energy. The electric bulb was invented by Thomas Alva Edison in 1879.

An electrical bulb has the following parts:

  1. A glass bulb.
  2. A thin coil of wire inside the glass bulb is called a filament. A bulb glows when an electric current passes through its filament. The filament heats up and glows to give light, filament is made of tungsten material.
  3. It has two thick wires that provide support to the filament. One wire is connected to the metal case and the other wire is connected to the metal tip.
  4. The metal tip and the metal case act as two terminals of an electric bulb.

These two terminals do not touch each other and are separated by an insulating material

CBSE Notes For Class 6 Science Chapter 9 Electricity And Circuits Torch Bulb And Its Inside View

Electric Circuit

A closed path along which the electricity can flow is called an electric circuit. It provides a complete path for electricity to pass (current flow) between two terminals of the electric cell

CBSE Notes For Class 6 Science Chapter 9 Electricity And Circuits Direction Of Current In An Electric Circuit

Electric current always flows from the positive to the negative terminal of the cell. The current passes only when the circuit is complete.

Types of circuits are as follows

  • Closed Circuit:  It is an unbroken path through
    which electricity can pass easily. It is a circuit in
  • Open Circuit:  It is a broken path through which electricity cannot pass. It is a circuit in which there is a gap in the connections between the terminals of the cell, wires the bulb, etc

Science Insight

Electric circuits can be classified as series and parallel circuits. In a series circuit, the electric current is the same, but in a parallel circuit, the current may vary. Electric circuits in our home are parallel circuits so that each appliance can take current as per it requirement

Fused Bulb

  • A bulb is said to be fused when the filament of a bulb is broken due to overheating.
  • A break in the filament of an electric bulb means a break in the path of the current between the terminals of the electric cell. Therefore, no current passes through its filament, and a fused bulb does not glow.

Electric Switch

A simple device -which is used to either break the electric circuit or to complete it, is known as an electric switch or key. The switches used in lighting of electric bulbs and other devices in homes

CBSE Notes For Class 6 Science Chapter 9 Electricity And Circuits Electric Switch

Electric, which can be used as a lamp. It has two or more two cells, one bulb, and a switch. When the electricity supply fails at home, a torch is used to provide light.

CBSE Notes For Class 6 Science Chapter 9 Electricity And Circuits Inside View Of Torch

Electric Conductors And Insulators

Electric conductors are those materials that allow electric current to pass through them. c.g. Iron, silver, aluminum, copper, brass, graphite. On the other hand, insulators are those materials that do not conduct electricity and are resistive to the flow of current.

Examples: Rubber, plastic, wood, ceramic, porcelain, asbestos, glass, mica, cotton, jute, thermocol, wax, etc.

All metals are good conductors of electricity, while all non-metals (except carbon) are bad conductors of electricity. Silver is a better conductor of electricity than copper.

Science Insight:

Water conductor or insulator?

Water behaves as both a conductor and an insulator. If water has impurities that help in conducting electricity, then it behaves like a conductor. On the other hand, if we use distilled water where no impurities are present, it behaves like an insulator.

Importance of Conductors and Insulators

  • Conductors and insulators are equally important to us.
  • Switches, electrical plugs, and sockets are made of conductors.
  • On the other hand, insulators like rubber and plastic are used for covering electrical wires, plugs, tops, switches, and other parts of electrical appliances that people might touch.

Note:  Your body is a conductor of electricity. Therefore, be careful when you handle an electrical appliance.

CBSE Notes For Class 6 Science Chapter 9 Electricity And Circuits

Activity 1

Aim:

To observe and study the working of torch bulbs.

Material Required:  A torch, and a magnifying glass.

Procedure

  • Take a torch and look inside its bulb by magnifying glass. You can also take out the bulb with the help of a teacher.
  • You will find a thin wire fixed in the middle of the glass bulb, as shown in the figure.
  • Now, switch ON the torch and observe the part of the bulb which is glowing

Conclusion:

We have observed that the thin wire in an electric bulb that produces light is known as the filament of the bulb

Activity 2

Aim:

To demonstrate the right connection of bulb and cell.

Material Required:

Four colored wires, a cell, and a bulb.

Procedure:

  1. First, remove the plastic covering of each end of the wire.
  2. Try to make connections as shown in the observation table.
  3.  Observe, whether the bulb glows or not, in each connection

Observation Table

CBSE Notes For Class 6 Science Chapter 9 Electricity And Circuits Different Connections Bulb

Conclusion

We have concluded from the above observation that (f) bulbs will glow because the circuit is complete and in other cases, bulbs will not glow because the circuit is incomplete

Activity 3

Aim:

To make a bulb light up using an electric cell.

Material Required:

A torch bulb, an electric cell, and a wire (with ends exposed or naked)

Procedure:

  • Join one end of the electric wire around the base electric bulb and leave the other end free.
  • Fix the tip of the base of the torch bulb with the positive terminal of the electric cell.
  • Bring the tip of the free end of the electric wire in contact with the negative terminal of the electric cell. We will find that the torch bulb starts glowing.
  • Remove the electric bulb away from the positive terminal of the electric cell. We notice that the bulb stops glowing.

Homemade torch:

CBSE Notes For Class 6 Science Chapter 9 Electricity And Circuits A Home Made Torch
Conclusion:

We have noticed that the bulb will glow’ when the circuit is complete but when we remove the bulb from the metal cap, the circuit is incomplete and the bulb goes off

Activity 4

Aim: To make a simple electric switch.

Material Required:

Two drawing pins, a safety pin, electric wires, a bulb, an electric cell, and a piece of thermal.

Procedure:

  • Insert a drawing pin into the ring at one end of the safety pin and fix it on the thermal.
  • Now, fix the other drawing pin on the thermal sheet in a way that the free end of the safety pin can touch it and attach the piece of wire with the drawing pins.
  • Make a circuit by connecting an electric cell and a bulb with the switch.
  • Rotate the safety pin, so that its free end touches the other drawing pin. You will find that the bulb starts glowing.
  • Now, move the safety pin away from the drawing pin.

You will find that the bulb stops glowing

CBSE Notes For Class 6 Science Chapter 9 Electricity And Circuits Simple And An Electric Circuit Switch

Conclusion:

  • We have concluded that, when we touch the free end of the safety pin with the other drawing pin, then the switch is said to be ON. Thus, the bulb starts glowing.
  • The bulb does not glow when the safety pin Is not in touch with the other drawing pin

Activity 5

Aim:

To examine whether a given material is a conductor or an insulator.

Material Required:

Key, scale, pins, glass bangle, electric bulb, electric cell, conducting wire.

Procedure:

  • Make a conduction tester by connecting an electric cell and bulb with the help of wires
  • Collect samples of different types of materials such assets, keys, scales, pins, etc.
  • Join the free ends of the wires of your tester with two ends of the samples.

CBSE Notes For Class 6 Science Chapter 9 Electricity And Circuits A Conduction Tester And Testing Whether The Bulb Glows

Now make a table of whether the bulb is glowing or not:

CBSE Notes For Class 6 Science Chapter 9 Electricity And Circuits Now Make A Table Whether Bulb Is Glowing Or Not

Conclusion:

We have concluded that objects which allow the current to pass through them are conductors, and objects which do not allow the current to pass through them are insulators.

CBSE Notes For Class 6 Science Chapter 8 Light Shadows And Reflections

Light Shadows And Reflections

CBSE Notes For Class 6 Science Chapter 8 Light Shadows And Reflections

Light Shadows And Reflections Luminous And Non-Luminous Objects

1. Luminous objects:

Luminous objects are those objects which give out or emit their light,

Example: Torch, bulb, the sun, stars, etc.

2. Non-luminous:

Non-luminous objects are those objects which do not emit their light and are visible to us when light from luminous objects falls on them and then reaches our eyes.

Example: Chair, moon, painting, etc.

CBSE Notes For Class 6 Science Chapter 8 Light Shadows And Reflections Luminous And Non Luminous

Science Insight:

Moon and planets do not have their light, they reflect the light coming from the sun. So, they are non-luminous objects

Read and Learn More Class 6 Science Notes

Transparent, Opaque And Translucent Objects

The objects which allow us to see through them are called transparent objects.

  • In other words, transparent objects are those objects that allow the light to pass through them completely. e.g. Glass, water, air, etc
  • The objects which do not allow us to see through them are called opaque objects.
  • In other words, opaque objects are those objects which do not allow the light to pass through them.
    • Example: Brick wall, cardboard, book, notebook, etc.
  • The objects which allow us to see partially through them are called translucent objects.
  • In other words, translucent objects are those objects which partially allow the light to pass through them.

Examples: Butter paper, wax paper, greased paper, etc.

CBSE Notes For Class 6 Science Chapter 8 Light Shadows And Reflections Transparent And Opaque And Translucent Objects

Shadows

The dark patches formed by opaque objects behind them when they come in the path of light are called shadows.

Shadows are formed behind the opaque objects as they do not allow the light to pass through them. Shadows are formed only by opaque objects.

  • Shadows of animals and birds hidden in your hand
  • Shadow gives us some information about the shapes of objects.
  • Sometimes, it can also mislead us because the shape of the shadow is not exactly that of the object.
  • In our daily life observations, we have noticed that the criss-cross pattern due to the light coming from window grills is the shadow of grills.

Shadows:

CBSE Notes For Class 6 Science Chapter 8 Light Shadows And Reflections Shadows Of Animals And Birds Hidden In Your Hand

To form a shadow, we need three things:

  1. A source of light
  2. An opaque object which comes in the path of light
  3. A screen on which shadow forms

Science Insight:

The shadow can be seen screen. Grounds, walls of a room, etc., act as observed shadows in daily life.

CBSE Notes For Class 6 Science Chapter 8 Light Shadows And Reflections

Some Important Facts about Shadow

  • The shadow of an object is formed on the opposite side of the light source.
  • Shadow changes its lengths and direction during the day
  • As the object moves, its shadow also moves.
  • Shadows are always black irrespective of the colour of the object.
  • The size and position of the shadow change with a change in the position of the light source or a change in the position of opaque objects

CBSE Notes For Class 6 Science Chapter 8 Light Shadows And Reflections Shadow Changes Its Lengths And Direction During The Day

Pinhole Camera

A pinhole camera:

A pinhole camera is a simple device, which is used to obtain an image of a bright object on a screen. A pinhole camera is just a closed box with a tiny hole (pinhole) at one end and a translucent butter paper (screen) on the other end.

CBSE Notes For Class 6 Science Chapter 8 Light Shadows And Reflections A Pinhole Camera

The light comes through the pinhole and the image is formed on butter paper (screen).

A pinhole camera works on the principle that light travels in a straight line.

The image formed by a pinhole camera is inverted and usually smaller in size as compared to the original object.

CBSE Notes For Class 6 Science Chapter 8 Light Shadows And Reflections Formation Of Image By Pinhole Camera

Never Ever Look Directly at The Sun:

An eclipse can be seen using a pinhole camera. When the eclipse is viewed through a pinhole camera, the sun’s image gradually becomes darker as the eclipse starts. We must take a precaution, i.e. not to see eclipse directly with our eyes as it may harm us.

Properties of Image Formed by Pinhole Camera

The image formed in a pinhole camera has the following characteristics

  • The image in a pinhole camera is inverted (upside down) as compared to the object.
  • The image in a pinhole camera is real (because it can be formed on a screen).
  • The image in a pinhole camera is of the same colour as the object.
  • The image in a pinhole camera can be smaller than the object, equational to the object or bigger than the object (depending on the distance of the screen from the pinhole).

Get it Right:

Students are often confused between mirror images and pinhole images. The image formed by a plane mirror is the same size as the object but the size of the image formed by a pinhole camera depends on the distance of the pinhole from the screen

Natural Pinhole Camera

  • One of the interesting pinhole cameras in nature is the small holes formed by a large number of leaves under the tree.
  • When we pass through under such trees, small circular patches seem to be under the tree. These circular patches are pinhole images of the sun.
  • The gaps between the leaves act as the pinholes. These gaps are all kinds of irregular shapes but we can see circular images of the sun.

CBSE Notes For Class 6 Science Chapter 8 Light Shadows And Reflections A Natural Pinhole Camera

Why image of the sun is not inverted in a pinhole camera?

In our daily life observation, we observe upside-down images of people with a pinhole camera but we can’t see this type of image in the case of the Sun. The reason behind this is the symmetrical and spherical shape of the Sun. The image of the sun is inverted but due to symmetry, the image appears to be the same as that of the original

Light Moves in a Straight Line

When we see a candle through a straight pipe, then it is visible but if we see the candle through a bent pipe, then it is not possible to see it

CBSE Notes For Class 6 Science Chapter 8 Light Shadows And Reflections Light Moves In A Straight Line

This concludes the light travels in a straight line, so we can say that the formation of pinhole images and shadows is possible only, when light moves in a straight path.

Mirror And Reflection

A mirror is a smooth surface that sends back all the light falling on it. The phenomenon of sending the back of the light by the mirror or other smooth surface is called reflection. Any surface that is well-polished or shiny acts like a mirror.

CBSE Notes For Class 6 Science Chapter 8 Light Shadows And Reflections Mirror And Reflection Of Light

Science Insight:

The mirror reflects the light at the same angle at which it hits the surface of the mirror. When we look into the mirror, we see our face inside it. The face we see Inside the mirror is the reflection of our face

We also see reflections of other objects that are in front of the mirror. Sometimes, we see reflections of trees, buildings and other objects in a pond or lake.

Reflection of tree In a pond:

CBSE Notes For Class 6 Science Chapter 8 Light Shadows And Reflections Reflection Of Tree In A Pond

Reflection of the face in a mirror:

CBSE Notes For Class 6 Science Chapter 8 Light Shadows And Reflections Reflection Of Face In A Mirror

Activity 1

Aim:

To classify the object is opaque, transparent or translucent.

Materials Required:

An eraser, plastic scale, pen, pencil, notebook, a single sheet of paper, tracing paper or a piece of doth, glass, etc.

Procedure

  • Hold each object one by one.
  • Try to look at something far away, through each object.
  • Observe and make a table, whether you can see through the object or not and classify the object according to the observation.

Observing Objects that do Or do not allow light to pass through them:

CBSE Notes For Class 6 Science Chapter 8 Light Shadows And Reflections Observing Objects Not Allow Light

CBSE Notes For Class 6 Science Chapter 8 Light Shadows And Reflections View Through The Object Possible And Objects

Conclusion:

Through this activity, we have concluded that

  • Transparent objects like glass, allow the light to pass through them completely. So, we can see objects through it very clearly.
  • Opaque objects like pencils and notebooks do not allow light to pass through them. So, we cannot see the object through it.
  1. Translucent objects like plastic scales partially allow the light to pass through them, So, we can sec objects through It but not clearly.

Activity 2

Aim:

To identify the opaque objects through its shadow.

Materials Required:

Different opaque objects like flowers, tables, chairs, kites, bulbs, sunlight, and some paper sheets.

Procedure

  • Spread the paper sheets on the ground, so it acts as a screen.
  • One by one hold each of the objects in the sunlight slightly above the ground and outline the shadows on the sheet.

Ask some other friends to identify the objects from these outlines of shadows.

CBSE Notes For Class 6 Science Chapter 8 Light Shadows And Reflections Ask Some Other Friends

Conclusion:

We have concluded from the above table that the shapes of shadow is not exactly those of the object, it can also mislead us about the object. So, we can’t always identify an object through its shadow

Activity 3

Aim:

To show that a screen is required for a shadow to be formed.

Materials Required:

A torch, an open ground, a paper sheet, etc.

Procedure:

  • In the evening, take a torch and a large sheet of paper and go with your friends to an open ground.
  • Direct the torch light towards the face of friend A.
  • Observe if you can see any shadow behind him, you will probably not see any shadow.
  • Now, ask friend B to hold a paper sheet behind friend A. This time, you will be able to see the shadow on the sheet.

CBSE Notes For Class 6 Science Chapter 8 Light Shadows And Reflections A Shadow Is Obtained Only On A Screen

Conclusion:

Conclusion  Through this activity, we have concluded that a shadow can be seen only when there is a screen behind an object.

Activity 4

Aim:

To know that shadow gives an accurate picture of the shape, size and colour of an object.

Materials Required: 

Some opaque objects like balls, tables, chairs, books, etc., and sheets of paper.

Procedure

  • Firstly spread the paper sheets on the ground under sunlight.
  • Hold the flower In the sunlight and observe the shape of the shadow formed on the paper sheet.
  • Similarly, hold the colour balls one by one In the sunlight and observe the colour of shadows formed on the paper sheet.
  • Similarly, hold the bottle at different angles and observe the length of shadows formed

CBSE Notes For Class 6 Science Chapter 8 Light Shadows And Reflections Longer Shadow Whon Source Is Not Different Angle

Conclusion:

  • Through step 2, we have concluded that some objects look similar to the shadows but some look very different.
  • Through step 3, we have concluded that we cannot the colour of objects through shadows because shadows are always black.
  • Through step 4, we have concluded that at different angles sizes of shadows are different.

So, finally, we can say that shadow cannot give the accurate shape, size and colour of the object.

Activity 5

Aim:

To make your pinhole camera.

Materials Required:

Two boxes, of tracing paper.

Procedure:

  • Take two boxes such that one can slide into another with no gap in between them.
  • Cut open one side ofeach box and on the opposite face ofthe larger box, make a small hole in the middle.
  • In the smaller box, cut out a square from the middle with a side of about 5 to 6 cm and cover this open square in the box with tracing paper
  • Slide the smaller box inside the larger one with the hole, in such a way that the side with the tracing paper is inside.
  • Now, your pinhole camera is ready for use.
  • Move the smaller box forward or backwards till you get a picture on the tracing paper pasted at the other end.

CBSE Notes For Class 6 Science Chapter 8 Light Shadows And Reflections A Sliding Pinhole Camera

Conclusion:

We have concluded the following observations

1. Pinhole images are inverted images of the object

2. The size of the image decreases as we decrease the distance between the screen and the pinhole.

CBSE Notes For Class 6 Science Chapter 8 Light Shadows And Reflections Distance Between Screen And Pinhole Is Reduced

3. The size of the image increases as we increase the distance between the screen and the pinhole.

CBSE Notes For Class 6 Science Chapter 8 Light Shadows And Reflections Distance Between Screen And Pinhole Is

Activity 6

Aim:  To show that light travels in a straight line.

Materials Required:  A rubber tube or pipe and a candle.

Procedure

  • Take a rubber tube or a pipe and fix a burning candle on the table.
  • Try to see the flame of the candle through the hole in the pipe, you will be able to see it.
  • Now bend this pipe a little and again try to see the flame of the candle through the pipe, you will not be able to see it.

CBSE Notes For Class 6 Science Chapter 8 Light Shadows And Reflections Light Travels In A Straight Line

Conclusion:

We have concluded that light travels in a straight line and cannot pass through a curved line.

Activity 7

Aim:

To show that the mirror changes the direction of light that falls on it

Materials Required:

A mirror, a source of light.

Procedure:

1. This activity involves three people and has to be done in a dark room or at night.

  • The first person holds the torch and stands in a corner.
  • The second person holds a mirror and stands at an angle.
  • A third person stands away from both people.

CBSE Notes For Class 6 Science Chapter 8 Light Shadows And Reflections A Mirror Reflects A Beam Of Light

2. Now direct a small beam of light on the mirror; A patch of light will appear on the other side of the room.

3. Adjust the torch in such a way that the patch of light falls on the third person in the room.

Conclusion:

We have concluded that the light is getting reflected by the mirror and the mirror can change the direction of the light beam falling on it.

Activity 8

Aim: 

To show that light travels in a straight line and gets reflected from a mirror.

Material required:

A torch, comb, mirror, a cardboard box and sheets.

Procedure:

  • Fix a comb and a plane mirror on a cardboard box
  • Spread the sheet of coloured paper at the base.
  • Switch ON the torch and observe the beam of light falling on the mirror and getting reflected on paper.’

CBSE Notes For Class 6 Science Chapter 8 Light Shadows And Reflections Light Reflected From A Mirror

Conclusion:

We have concluded that light rays travel in a straight line and bounce off at the same angle from the mirror

CBSE Notes For Class 6 Science Chapter 7 Motion And Measurement Of Distances

Motion And Measurement Of Distances

CBSE Notes For Class 6 Science Chapter 7 Motion And Measurement Of Distances

Motion And Measurement Of Distances Story Of Transport

A way to carry people and goods from one place to another is called transport. We will now discuss how people traveled and carried goods from one place to another in earlier times and how they do it these days.

  • In ancient times, people did not have any means of transport. They used to move only on foot and carry goods on their back. Later on, they began to use animals for transportation.
  • For transport through water routes, boats were used from ancient times. Boats were simple logs of wood in which a hollow cavity could be made. Later, people learned to put together different pieces of wood and gave shapes to the boats. These shapes imitated the shapes of the animals living in water.
  • After many years, man invented the wheel, which led to the discovery of wooden carts and sleds that helped man to transport goods on land and ice. Later, they used animals like horses and camels to pull the wheels. The invention of the wheel also led to the discovery of the bicycle.
  • In the beginning of the 19th century, the invention of the steam engine introduced a new source of power to run transport vehicles.

Read and Learn More Class 6 Science Notes

Steam engines (which used coal as fuel for making steam) were used to pull trains on railroads (railway tracks) for carrying people and goods from one place to another. Steam engines were also used to run ships in the beginning.

CBSE Notes For Class 6 Science Chapter 7 Motion And Measurement Of Distances Various Means Of Transport

Science insight:

James Watt (a Scottish engineer) invented the steam engine in 1756. The steam engine is called an external combustion engine because the fuel ; (coal) for making steam was burnt outside the engine.

  • After a few years, the invention of the internal combustion engine (which uses petrol or diesel as fuel) gave us transport vehicles, which are known as automobiles (cars, buses, scooters etc.) for travel on land.
  • On the other hand, motorized boats and ships were developed as means of transport on water.
  • In the early years of 1900, aeroplanes were discovered as a means of transport which are also considered as the fastest means of transportation for goods and people.
  • Electric trains, monorails, supersonic airplanes and spacecraft are also some of the 20th-century contributions to the modes of transport.

Need of Measurement

There are so many occasions when we come across a need to measure distance and length, e.g.,

  • If you want to go to your friend’s house or the market, the first thing you want to know is the distance between your house and the place.
  • The tailor needs to measure the length of the cloth to know if it is enough to stitch a kurta.

So, we can say that distance or length is the measure of how far or long something is. In other words, the actual path length covered by an object between two points is called distance.

Measurement

Measurement is the. method of comparison of any unknown quantity with a known quantity. This known quantity is known as a unit.

  • The result of measurement is expressed in two parts, i.e. a number and a unit of the measurement.
  • For example, we measured the length of the desk as 2 meters. In this case, the first part is a number that is 2 and the second one is a unit that is a metre.

CBSE Notes For Class 6 Science Chapter 7 Motion And Measurement Of Distances

Ancient Methods of Measurement

In ancient times, people used the following different units for the measurement of length and distance.

1. Handspan

Hand span is the length between the tip of the thumb and the little finger of our hand when we stretch it as shown in the figure.

CBSE Notes For Class 6 Science Chapter 7 Motion And Measurement Of Distances Hand Span

2. Cubit

Cubit is the length between the tip of the middle finger and the elbow when we stretch our hand horizontally. It was used to measure length in ancient Egypt.

CBSE Notes For Class 6 Science Chapter 7 Motion And Measurement Of Distances Cubit

3. Yard

Yard is the length between the tip of the middle finger and the chin of an outstretched arm. It was used to measure the length of clothes and wires.

CBSE Notes For Class 6 Science Chapter 7 Motion And Measurement Of Distances Yard

4. Footstep

The footstep is the length between the thumb and the heel of the foot. We used this method to measure the distance.

CBSE Notes For Class 6 Science Chapter 7 Motion And Measurement Of Distances Foot Step

5.  Mutthi

Mutthi  (Fist) refers to the quantity that a person’s fist (mutthi) can hold. It was used to measure quantities of small things like wheat, rice sugar, etc.

CBSE Notes For Class 6 Science Chapter 7 Motion And Measurement Of Distances Fist

6. Angul (finger)

Angul is the width of a finger. It was used to measure very small distances with the help of fingers. You may heard from your grandparents, it is the gap of chaar angul (four fingers).

CBSE Notes For Class 6 Science Chapter 7 Motion And Measurement Of Distances Angul

Standard Units of Measurement

The ancient methods of measurement were inaccurate and changed from person to person. Hence, to have a fixed value for a unit of measurement, standard units of measurement were developed.

The standard system of units is called the SI system (System International and Units in French).

1. The SI unit for measuring length is a meter (m).

1 m = 100 cm, 1 cm = 10 mm

2. For long distances meter is not a convenient unit, hence we define a larger unit of length that is a kilometer (km).

1 km= 1000 m

3. The smallest unit to measure length is fermi (fm).

⇒ \(1 \mathrm{fm}=\frac{1}{10^{15}} \mathrm{~m}\)

Correct Measurement of Length

For measurement, usage of the correct device is very important,

Example:

You cannot measure the girth of a tree or the size of your chest using a meter scale. For this, measuring tape is more suitable. So, for measurement, usage of the correct device and way of measuring things plays a vital role.

1. Precautions while Taking Measurements:

For taking measurements, we must take care of the following things

1. To take measurements of the length of the object, we must put the scale along its length as shown in the figures.

CBSE Notes For Class 6 Science Chapter 7 Motion And Measurement Of Distances Method Of Placing Scale Along The Length To Be Measured

2. If the end of the scale is broken and we are not able to see a zero mark, then take any full mark and subtract the reading of this mark from the reading at the other end as shown in the figures.

CBSE Notes For Class 6 Science Chapter 7 Motion And Measurement Of Distances Incorrect 1 And 2 Correct Method Of Placing The Scale

3. During measurement, the position of the eye is also very important. So, we must keep our eyes in such a way that it is exactly in front of the point where the measurement is to be taken as shown in the figure.

CBSE Notes For Class 6 Science Chapter 7 Motion And Measurement Of Distances B Is The Proper Position Of The Eye For Taking Measurement

2. Measuring the Length of a Curved Line:

We cannot measure the length of a curved line directly by using a meter scale. We can use a thread to measure the length of a curved line. If we carefully move the thread along the curved line while keeping it stretched tightly and then measure the used part of the thread by a meter scale, we can get to know the length of the curved line.

Moving Things Around Us

When a body changes its position concerning time, then it is said to be in motion, e.g. moving ant, the hands of the clock, a running car, the revolution of the earth around the sun, etc.
On the other hand, when a body does not change its position concerning time, then it is said to be stationary or at rest.

Example: Table, house, tree, etc.

CBSE Notes For Class 6 Science Chapter 7 Motion And Measurement Of Distances Car Is In Motion Because Its Position Has Changed With Time

Types of Motion

  • When we see around us, we experience the motion of a vehicle, the march past of soldiers, the running fan the motion of a bicycle, etc.
  • Different objects show different types of motion. Some of the circular motion is periodic but a periodic motion may or the important types of motions stated as follows may not be circular

1. Rectilinear Motion:

A body is said to be in rectilinear motion, if it moves in a straight line without changing its direction of motion, e.g. Vehicle running on a straight road, the motion of a bullet when fired, sprinters in a 100 m race, march-past of soldiers, etc.

CBSE Notes For Class 6 Science Chapter 7 Motion And Measurement Of Distances Rectilinear Motion

2. Circular Motion:

A body is said to be in a circular motion if it moves in a circular path around a fixed point,

Example:  Hands of a clock, the motion of a stone in the following figure. In this case, the distance of the stone from your hand is not changing because the length of the string is not changing.

CBSE Notes For Class 6 Science Chapter 7 Motion And Measurement Of Distances Circular Motion Of A Stone

3. Periodic Motion:

The motion which repeats itself after a regular interval of time is known as periodic motion,

Example: The motion of the minute hand of our wristwatch, the motion of a simple pendulum, revolution of planet around the sun.

CBSE Notes For Class 6 Science Chapter 7 Motion And Measurement Of Distances Motion Of Pendulum

Note You might have observed some objects possess more than one type of motion, e.g. sewing machine remains at rest while its wheels move in circular motion and the needle moves in periodic motion.

Activity 1

Aim:

To measure the length and width of the classroom by foot

Material Required:

Classroom and 3 friends.

Procedure:

  • Place your foot along the length of the classroom.
  • Now, put your second foot next to your first foot without leaving any space between the two feet.
  •  Now, put your first foot next to your second foot
  • Repeat this process until you reach the other side of the floor.
  • Similarly, measure the width of the classroom. If some part remains to be measured as it is smaller than your foot, then use a string to measure that part of the length.
  • Ask your friends to do the same procedure.

CBSE Notes For Class 6 Science Chapter 7 Motion And Measurement Of Distances Measuring The Classroom Length

Now, make an observation flow chart as follows:

CBSE Notes For Class 6 Science Chapter 7 Motion And Measurement Of Distances Measuring The Class Room Length

Conclusion:

Length and breadth are not the same, it varies from person to person.

Activity 2

Aim:

To measure the width of the table with a handspan to know about the unit.

Material Required:

A classroom table and 3 friends.

Procedure:

  • Place your thumb on the left corner of the table as shown in the figure. Now, measure the complete width of the desk using your handspan.
  • Count the number of handspans
  • Now, ask your friends to do the same.

CBSE Notes For Class 6 Science Chapter 7 Motion And Measurement Of Distances Width Of A Table With A Handspan

Record all the observations in a flow chart as shown below:

CBSE Notes For Class 6 Science Chapter 7 Motion And Measurement Of Distances Width Of A Table With A Handspan.

Conclusion Handspan is a known quantity and the width of the table is an unknown quantity. The measurement of the width of the table is different for different people.

Activity 3

Aim:

To measure the height of your friend using a handspan and then by using a meter scale.

Material Required:

1 marker, 1-meter scale and 3 friends.

Procedure:

  • Ask one of your friends to stand with his back against a wall
  • Make a mark exactly above your friend’s head.
  • Measure the distance of this mark from the floor using handspan and then with a meter scale

CBSE Notes For Class 6 Science Chapter 7 Motion And Measurement Of Distances Height Measurement

Ask other friends to do the same flow chart:

CBSE Notes For Class 6 Science Chapter 7 Motion And Measurement Of Distances Heigth Measurement

  • Now, record all the observations in a table as shown below Conclusion Height in handspan is different for different students because the length of their handspan is different.
  • Height in cm is approximately the same. It varies slightly due to errors while marking.

Activity 4

Aim:

To measure the length of a curved line using thread.

Material Required:

A thread, a marker and a meter scale.

Procedure:

  • Put a knot on the thread near one of its ends.
  • Place this knot on the point A. Now, place a small portion of the thread along the curved line. Place a finger on the thread to hold it there.
  • Using the other hand, stretch the thread a little more
  • Repeat this process till the other end 2 and mark on a thread where it touches point 2.
  • Now, stretch the thread along a meter scale and measure the length between the know and the final marker

CBSE Notes For Class 6 Science Chapter 7 Motion And Measurement Of Distances Length Of A Curved Line With A Thread

Conclusion:

The length of the curved line from point A to point B is 10.2 cm.

Activity 5

Aim: 

To identify objects in motion and objects at rest.

Material Required: 

3-4 blank papers and pen

Procedure:

  • Go to different rooms of your house and make a list of different objects that you see.
  • Now, visit any nearby park and make a list of objects that you see.
  • Now, visit any nearby market and again make a list.
  • Now, divide all the objects into two parts.
  • The first part is objects at rest and the second part is objects in motion.

Crowd Park:

CBSE Notes For Class 6 Science Chapter 7 Motion And Measurement Of Distances Crowded Park

Observation of the flow chart:

CBSE Notes For Class 6 Science Chapter 7 Motion And Measurement Of Distances Observation The Table

Conclusion:

From this activity, we concluded that some objects change their position like flying birds, balls, etc., and these objects are in motion. Some other objects do not change their position e.g. table, bench, etc., these objects are at rest.

Activity 6

Aim:

To understand the meaning of motion by observing an ant.

Material Required:

Sugar cubes, a clear white paper of large size, and a gel pen.

Procedure:

  • Visit your nearby garden and find a place where ants are present.
  • Now, spread the white sheet near the ants and spread some sugar cubes on it.
  • When any ant starts moving on the paper, make a small mark near its position.
  • Keep marking its position after every few seconds as it moves along the paper.
  • After some time, shake the paper to make it free from sugar and ants. Connect all the marked points with arrows to show the direction in which the ant moved.
  • Conclusion From this activity, we concluded that the ant has changed its position after some time and the path of the ant is not definite.

Activity 7

Aim:

To observe the motion of a whirling stone.

Material Required:

A small stone and a strong string.

Procedure:

  • Tie the stone with a string that you have.
  • Now, hold the other end of the string.
  • Now, whirl it with your hand and observe the motion of the stone. You will find that it is moving in a circular path.

CBSE Notes For Class 6 Science Chapter 7 Motion And Measurement Of Distances Circular Motion Of A Stone And Thread

Conclusion:

We concluded that the motion of the whirling stone is circular.

CBSE Notes For Class 6 Science Chapter 6 The Living Organisms: Characteristics And Habitats

The Living Organisms: Characteristics And Habitats

Living organisms can be found everywhere on the Earth including extremely hot deserts, cold mountains, deep oceans, and even in the openings of volcanoes. All these places are so different from each other, yet all of them have living organisms of various kinds.

In the mountains of the Himalayas, where it is very cold, many kinds of trees like oaks, pines, and deodars are found.

Similarly, hot desert areas, like Rajasthan, have different kinds of cactus plants and seashore areas like Puri have an abundance of Casuarina trees. Like plants, different kinds of animals are also found in different areas.

CBSE Notes For Class 6 Science Chapter 6 The Living Organisms Characteristics And Habitats

Organisms And The Surroundings Where They Live

The kinds of plants and animals found in one region are very different from the plants and animals of the other regions. Some of the examples are listed below.

Read and Learn More Class 6 Science Notes

CBSE Notes For Class 6 Science Chapter 6 The Living Organisms Characteristics And Habitats

CBSE Notes For Class 6 Science Chapter 6 The Living Organisms Characteristics And Habitats

Adaptation

Adaptation is the presence of specific features or certain habits that enable a plant or an animal to live in its surroundings naturally. Different animals are adapted to their surroundings in various ways.

For example, the sea and the desert are very different surroundings, and different kinds of plants and animals are found in these two regions. Let us take examples of caramel (from the desert) and fish (from the sea) to understand it better.

1. Adaptations in Camel

The features of a camel, that help it survive in desert conditions are listed below

  1. Camels have long legs which help to keep their bodies away from the heat of the sand.
  2. They excrete a small amount of urine and their dung is dry. They do not sweat. Since they lose very little water from their bodies, camels can live for many days without water.
  3. Padded feet help camel to walk on hot and slippery sand without sinking.

CBSE Notes For Class 6 Science Chapter 6 The Living Organisms A camel

2. Adaptations in Fish

The features of a fish which enable it to live in freshwater sea are listed below

  1. They have streamlined shapes. This shape helps them to move inside water.
  2. They have slippery scales on their bodies. These scales protect the fish and also help in easy movement through water.
  3. They have flat fins and tails that help them to change directions and keep their body balanced in water.
  4. Gills present in the fish help them to use oxygen dissolved in water.

CBSE Notes For Class 6 Science Chapter 6 The Living Organisms Adaptations In fish

Acclimatization

It can be defined as the process where an organism adjusts its behavior or physiology in response to changes in its environment (i.e. altitude, temperature, etc.).

For instance, if we live in the plains and suddenly go to high mountain regions we may experience difficulty in breathing, nausea, headache, etc. This happens because the air supply is reduced at high altitudes.

However, after a few days, our body adapts to this change. This is called the acclimatization of the body to the environment. These changes are different from adaptations that take place over thousands of years.

Habitat

The place where an organism lives, grows, and interacts with other organisms is called habitat. It provides the living organism with food, shelter and favorable climatic conditions to survive, breed, and flourish.

Several kinds of plants and animals may share the same habitat. Living beings live on land, in water, or on trees.

Types of Habitat

Habitat is broadly divided into two types, i.e. terrestrial and aquatic.

  1. Terrestrial Habitats The plants and animals that live on land are said to live in terrestrial habitats, for Example forests, grasslands, deserts, and coastal and mountain regions.
  2. Aquatic Habitats The habitats of plants and animals that live in water are called aquatic habitats, for Example ponds, swamps, lakes, rivers, and oceans.

There are large variations among terrestrial habitats like forests, grasslands, deserts, and coastal and mountain regions located in different parts ofthe world. Similar variations are observed for all aquatic habitats.

Components of a Habitat

  • Habitat consists of living organisms interacting with the environment. It has two basic components.
  • Abiotic Components These include non-living components, for example. air, water, soil, sunlight, rocks, etc.
  • Biotic Components These include living organisms, Exampele plants and animals.

Components of a Habitat

Habitat consists of living organisms interacting with the environment. It has two basic components.

  1. Abiotic Components These include non-living components, for example, air, water, soil, sunlight, rocks, etc.
  2. Biotic Components These include living organisms, for Example plants and animals.

Some Terrestrial Habitats

The organisms that live on land are said to live in terrestrial habitats. Some of them are as follows

Deserts

These habitats include vast areas of land with sand and little or no vegetation. They also get very little rain. These are hot and dry places. Organisms that live here have to cope with these adverse climatic conditions, so they develop adaptations accordingly.

Adaptations in Plants

The desert plants have the following adaptations that help them to survive in hot and dry conditions.

  1. Leaves are either absent or are very small and spiny to reduce water loss through transpiration.
  2. The leaf-like structure in a cactus is its stem. Photosynthesis in these plants is usually carried out by the stem. The stem is also covered with a thick waxy layer which helps to retain water.
  3. Also, plant roots are very deep for absorbing water from larger areas, for example, Acacia, ber, etc.

CBSE Notes For Class 6 Science Chapter 6 The Living Organisms Some Typical plants that grow in desert

Adaptations in Animals

The desert animals have the following adaptations that help them to survive in hot and dry conditions.

  1. There are desert animals like rats and snakes, which stay in burrows deep in the sand during the daytime to stay away from the intense heat.
  2. These animals come out only during the night when it is cooler.

CBSE Notes For Class 6 Science Chapter 6 The Living Organisms Desert Animals In Burrow

Science Insight Some animals show behavioral adaptation, A Cape ground squirrel uses a long bushy tail as a parasol or an umbrella. It provides shade in the scorching heat of the Sun.

Mountain Regions

These areas are generally very cold and windy. Some mountains may receive snowfall during winter. As we go up in the mountainous regions, the surroundings change and we see different kinds of adaptations at different heights.

The plants and animals inhabiting these regi show special kinds of adaptations as given below

Adaptations in Plants

There are following features present in plants that help them to survive in mountain regions are

  1. The trees are usually cone-shaped with tilted branches which helps rainwater and snow to slide off easily.
  2. They have thick bark to protect them against the severe cold.
  3. These plants bear needle-shaped leaves, thus reducing water loss.

Adaptations in Animals

The animals living in the mountain regions have the following adaptations

  1. The yak has thick skin or fur to protect them from cold.
  2. The snow leopard has thick on its body including toes and feet This protects its feet from the cold when it walks on the snow.
  3. The mountain goat has long hair to keep it warm and strong hooves for running up the rocky slopes of the mountains.

Science Insight Animals like hedgehogs and dormouse hibernate (deep sleep) throughout the winter to save energy and survive the winter without eating much. They utilize the stored food (as fat) in their bodies.

Grasslands

  1. These habitats include short and tall grasses scattered with small and large trees. Such habitats have hot summers and chilly winters.
  2. Lions and deer have different types of adaptations to survive in the same habitat.

Lion

It is a strong animal that can hunt and kill animals like deer. The adaptations which enable lions to survive in a forest or a grassland are as follows.

  1. It is a light brown which helps it to hide in dry grasslands when it hunts for prey (animals to eat).
  2. It has long claws in its front legs that can be withdrawn inside the toes.
  3. The eyes in front of the face allow it to have a correct idea about the location of its prey

Deer

It is another animal that lives in forests and grasslands. The following features help it to survive in this habitat.

  1. It has strong teeth for chewing hard plant stems in the forest.
  2. A deer needs to know about the presence of predators (animals that feed on other animals, like lions) to run away from them and not become their prey so, it has long ears to hear the movements of predators.
  3. The eyes on the sides of its head allow it to look in all directions for danger.
  4. The speed of the deer helps it to run away from the predators.

Some Aquatic Habitats

The organisms that live in water are said to live in aquatic habitats. These are further subdivided into marine and freshwater habitats.

Oceans

Oceans and seas are marine water habitats. The animals living in the ocean show a variety of shapes and structures. Some examples are given below.

  1. Many sea animals have streamlined bodies to help them move easily in water, Example fishes.
  2. Octopuses and squids do not have this type of body. They stay in the deeper layer of the ocean, near the seabed, and catch any prey that moves towards them. However, while moving in water, they can streamline their bodies.
  3. These animals have gills to breathe and use the oxygen dissolved in water.
  4. Whales and dolphins do not have gills. They breathe in air through nostrils or blowholes. These are located at the upper part of their heads.
  5. This allows them to breathe In air when they swim to the surface of the water. They can stay inside the water for a long time without breathing. They come out to the surface from time to time, to breathe in air.

Ponds and Lakes

  1. The ponds, lakes, and rivers are freshwater aquatic habitats.
  2. The plants which grow in water are called aquatic plants.
  3. All aquatic plants have the following aquatic adaptations
  4. Their roots are either small or not very well developed with the primary function of anchorage.
  5. Their leaves are ribbon-like and long to cope with the water currents.
  6. Stems of these plants are long, hollow, and light with spaces filled with air to keep them floating.
  7. The plant body is covered with mucilage which prevents decay in the water.

There are three types of aquatic plant

  1. Free-Floating These aquatic plants float on water. Their roots are very small and they freely float on the surface of the water, for example, water hyacinths.
  2. Partly Submerged These aquatic plants are fixed in the soil at the bottom by their roots. The stem of these plants grows up to the surface of the waterbody, and leaves and flowers float on the surface of the water, for example, lily and lotus.
  3. Completely Submerged All the parts of such plants like stems, branches, and leaves are underwater. These plants are also fixed to the soil at the bottom by their roots example hydrilla.

CBSE Notes For Class 6 Science Chapter 6 The Living Organisms Types Of Aquatic Plants

Adaptations In Frog

They usually have ponds as their habitat. Frogs can stay both inside the pond water as well as move on land. They have strong back legs that help them in leaping and catching their prey. They have webbed feet which help them swim in water.

Characteristics Of Living Organisms

A large variety of materials or things are present around us. Some of them are living while others are non-living. Living organisms can be identified based on the following features.

  1. They need food, water, and air to survive.
  2. They can grow.
  3. They can move on their own.
  4. They respond to stimuli.
  5. They reproduce themselves.
  6. They respire and release energy from food.
  7. They excrete and get rid of waste materials from their body.
  8. They have a definite lifespan.
  9. They are made up of living cells.
  10. Non-living things do not perform any of the above functions.

Let us discuss a few important characteristics of living beings in detail

1. Food

  • AH living beings including plants and animals need food to stay alive. Food gives organisms the energy needed to grow. Organisms also need this energy for the life processes that go on inside them.
  • Along with food they also need air and water. Plants make their food with the help of sunlight, air, and water, through the process known as photosynthesis. Whereas animals and humans depend on plants other animals and their products for their survival.

2. Growth

All living things (plants and animals) show growth by increase in size and weight. When living things grow, they become taller and bigger on their own. For example,

  1. A baby grows into an adult.
  2. A small puppy grows and becomes a dog.
  3. A chicken hatched from an egg grows and becomes a hen or a cock.
  4. Similarly, a small plant grows and becomes a big tree.

3. Respiration

  1. It is a vital process carried out by all living organisms. It is through respiration that the body finally obtains energy from the food it takes.
  2. When we inhale, the air moves from the outside to the inside of the body. When we breathe out we expel the air which is inhaled.
  3. Breathing is a part of respiration. All living organisms breathe in oxygen, which is used by the living body and gives out carbon dioxide produced in the process. The mechanism for the exchange of gases is different in different organisms.

Some examples are given below

  1. Earthworm breathes through its skin.
  2. Fishes use gills to obtain dissolved oxygen from water.
  3. Insects have tiny pores on their exoskeleton (body wall).
  4. Plants also respire through tiny pores present on their leaves called stomata.

In sunlight, plants use carbon dioxide in the air to produce their food and give out oxygen. Plants produce their food only during the daytime, whereas respiration in them takes place day and night.

The amount of oxygen released in the process of food preparation by plants is much more than the oxygen they use in respiration.

4. Response to Stimuli

All living things respond to changes around them. The changes in our surroundings that make us respond to them are called stimuli. A few examples are given below

  1. Wild animals run away when a bright light is flashed on them.
  2. Cockroaches begin to move to their hiding places if the light in the kitchen is switched on at night.
  3. We close our eyes when a sudden bright light is flashed or when we suddenly move from a dark place to bright sunlight.
  4. In some plants like Mimosa, commonly known as ‘touch-me-not’ leaves close or fold when someone touches them. Flowers of some plants bloom only at night whereas in some plants flowers close after sunset.

5. Excretion

The process of removal of waste from the body is called excretion.

All living things take food, but not all food that is eaten is used. A part of it that is not used is removed as a waste.

Our body also produces waste products in life processes like respiration, digestion, etc. These waste products are harmful to our body which is why these products have to be removed from our body. Thus, it becomes a necessary process carried out by all living organisms.

Plants also Excrete

The mechanisms of excretion in plants are a little different. Some harmful or poisonous materials are produced in plants as waste.

Some plants find it possible to store the waste products within their parts in a way that they do not harm the plant as a whole.

They shift waste products towards the outermost layer of the stem, making it harder and stronger. Some plants remove waste products as secretions, For Example, gum and resins are excretory products of the plant.

Science Insight The excretory products of plants are used in many ways. For example, resins are used to make paints and varnishes, gums are used to treat wounds, and serve as an important ingredient in adhesives

6. Reproduction

It is the process by which living things produce more of their kind. This is true for both animals and plants.

Reproduction takes place in many different ways in different organisms. Some modes of reproduction are given below

  1. Animals like insects, fishes, and birds lay eggs and when these eggs hatch, the young ones come out and grow into adults,
  2. Some animals like cats, dogs, cows, and human beings give birth to young ones.
  3. Plants also reproduce. Many plants produce seeds which can germinate and grow into new plants.

CBSE Notes For Class 6 Science Chapter 6 The Living Organisms Birds Lay Eggs Which After Hatching Produces

Some plants reproduce through parts other than seeds, Example a part of a potato with a bud, grows into a new plant. They also reproduce through cutting.

CBSE Notes For Class 6 Science Chapter 6 The Living Organisms A Seed From A Plant Germinates Into A Plants

CBSE Notes For Class 6 Science Chapter 6 The Living Organisms A New Plant Grows From A Bud Of Potato

7. Movement

It is one of the most important signs of life in an organism. All living things move by themselves. Animals can from one place to another.

Plants are generally anchored in soil so they do not move from one place to another. However, various substances like water, minerals, and the food synthesized by them move from one part of the plant to another. Also, opening and closing off lower is a movement.

Death

It is another common characteristic of living beings simple. It marks the ending oflife and reproduction is the starting oflife. Reproduction ensures the continuity of particular organisms.

A particular type of organism can survive over thousands of years only if it reproduces its kind. One single organism may die without ever reproducing, but that type of organism can exist only if there is reproduction.

Some Exceptions of Living Organisms

We can conclude that living things may have all the characteristics that we have discussed, while non-living things may not show all these characteristics at the same time.

  • Non-living things like cars, bicycles, clocks, and water in the river move. The Moon moves in the sky, and a cloud grows in size.
  • Sometimes living things may also not show all the characteristics of the living. For example, seeds stay in a shop for months and do not show any growth or some of the other characteristics of life. However, we bring the same seed and plant it in soil, water it and it turns into a whole plant.

Activity 1

Aim: To show the effect of abiotic factors on the germination of seeds to form young plants.

Materials Required: Dry moorig seeds, water, 5-6 containers, refrigerator.

Procedure:

  1. Collect some dry moong seeds.
  2. Keep 20-30 seeds aside and soak the rest in water for a day.
  3. Divide the soaked seeds into four parts, i.e. (Parts A to D).
    1. Part A = Completely submerged in water for 3-4 days.
    2. Part B = In a sunny room
    3. Part C = In a cupboard that does not allow any light to come in.
    4. Part D = In the refrigerator.

4. Let the setup remain undisturbed and observe after a few days.

Observation: After a few days following observations are made

CBSE Notes For Class 6 Science Chapter 6 The Living Organisms Observation The Effect Of Abiotic Factors

Conclusion: We conclude that sunlight, air, water, and proper temperature are necessary for the germination of seeds.

Activity 2

Aim: To show that a desert plant loses very little water through transpiration.

Materials Required: One potted leafy plant, one potted cactus plant, two transparent polythene bags, thread.

Procedure:

  1. Take two potted plants, one leafy and another cactus.
  2. Tie separate polybags to both plants and keep them in sunlight.
  3. After a few hours observe the inner surface of polybags.

Observation: We will observe that there are more water droplets in the leafy plant as compared to the cactus plant.

Conclusion: The rate of transpiration (loss of water through leaves) in cactus, is much lower as compared to the leafy plant. This is because of the adaptation acquired by cacti to survive in hot and dry places.

Activity 3 

Aim: To show that sunlight acts as a stimulus for plants.

Materials Required: A potted plant, water,

Procedure:

  1. Place a potted plant in a dark room near a window through which sunlight enters the room as shown in the figure.
  2. Water the plant regularly and observe it for a few days. Observation We will observe that the growth of the plant occurs towards the window from where the plant gets sunlight.

Conclusion: Plants tend to grow toward sunlight so, that they can avail it and carry out photosynthesis. Thus, sunlight serves as a stimulus for plants.

CBSE Notes For Class 6 Science Chapter 6 The Living Organisms Plant Respond To light